Install CUDA 9.0 and cuDNN 7.2 for Tensorflow on Ubuntu 16.04

The content of this post is mostly copied from here. The reason I do this is to ensure that that really helpful post will be accessible and to add few modifications.


1. Update and dependencies

# Update apt-get
sudo apt-get update
sudo apt-get upgrade

# Install Dependencies
sudo add-apt-repository ppa:deadsnakes/ppa
sudo apt-get install build-essential
sudo apt-get install cmake git unzip zip
sudo apt-get install python2.7-dev python3.5-dev python3.6-dev pylint

# Kernel header
sudo apt-get install linux-headers-$(uname -r)

2. Install NVIDIA CUDA Toolkit

Go to https://developer.nvidia.com/cuda-downloads and download CUDA Toolkit 9.0 (Legacy) for Ubuntu 16.04. Download deb (local) which is 1.2 GB.

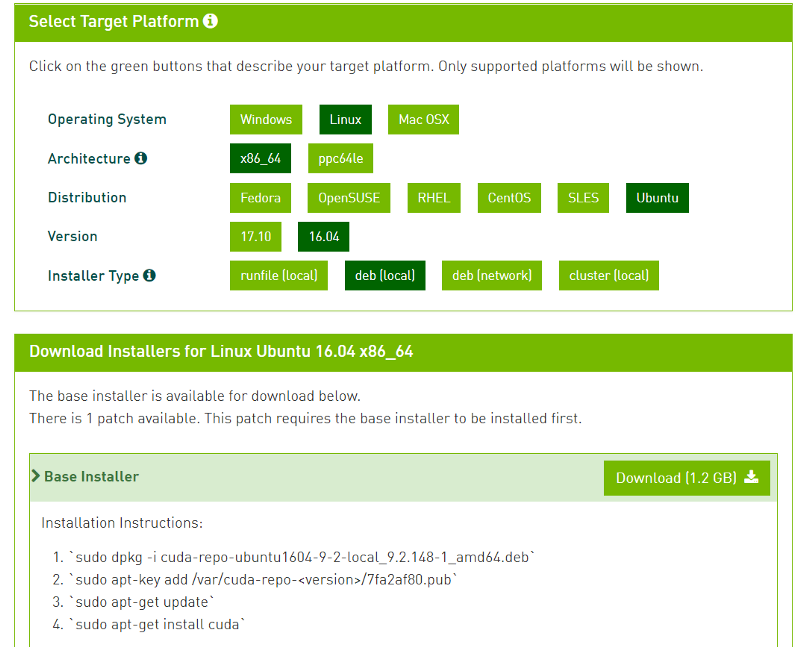
sudo dpkg -i cuda-repo-ubuntu1604-9-0-local_9.0.176-1_amd64.deb
sudo apt-key add /var/cuda-repo-9-0-local/7fa2af80.pub
sudo apt-get update
sudo apt-get install cuda-9.0
# Reboot
sudo reboot

vi ~/.bashrc
# add those 2 lines at the end of the file then save it
export PATH=/usr/local/cuda-9.0/bin:$PATH
export LD_LIBRARY_PATH=/usr/local/cuda-9.0/lib64:$LD_LIBRARY_PATH

Then, execute the following commands and check that nvidia-smi works.

source ~/.bashrc
sudo ldconfig
nvidia-smi

3. Install cuDNN 7.2.1

Go to https://developer.nvidia.com/cudnn, login/register, go to cuDNN Download, Archived cuDNN releases and download cuDNN v7.2.1 (August 7, 2018), for CUDA 9.0. Now, for some reason, it seems that that version of cuDNN is only available for CUDA 9.2, but we can just change the download links manually from the CUDA 9.2

cuDNN v7.2.1 Runtime Library for Ubuntu16.04 (Deb): https://developer.nvidia.com/compute/machine-learning/cudnn/secure/v7.2.1/prod/9.0_20180806/Ubuntu16_04-x64/libcudnn7_7.2.1.38-1_cuda9.0_amd64
cuDNN v7.2.1 Developer Library for Ubuntu16.04 (Deb): https://developer.nvidia.com/compute/machine-learning/cudnn/secure/v7.2.1/prod/9.0_20180806/Ubuntu16_04-x64/libcudnn7-dev_7.2.1.38-1_cuda9.0_amd64
cuDNN v7.2.1 Code Samples and User Guide for Ubuntu16.04 (Deb): https://developer.nvidia.com/compute/machine-learning/cudnn/secure/v7.2.1/prod/9.0_20180806/Ubuntu16_04-x64/libcudnn7-doc_7.2.1.38-1_cuda9.0_amd64

Install them in the right order:

sudo dpkg -i libcudnn7_7.2.1.38–1+cuda9.0_amd64.deb
sudo dpkg -i libcudnn7-dev_7.2.1.38–1+cuda9.0_amd64.deb
sudo dpkg -i libcudnn7-doc_7.2.1.38–1+cuda9.0_amd64.deb

Verify the installation

cp -r /usr/src/cudnn_samples_v7/ $HOME
cd $HOME/cudnn_samples_v7/mnistCUDNN
make clean && make
./mnistCUDNN

You should expect a “Test passed!”.

CUPTI ships with the CUDA Toolkit, but you also need to append its path to the LD_LIBRARY_PATH environment variable

vi ~/.bashrc
export LD_LIBRARY_PATH=/usr/local/cuda/extras/CUPTI/lib64:$LD_LIBRARY_PATH
source ~/.bashrc

4. Install TF and verify it works

pip install tensorflow-gpu

Run

import tensorflow as tf
with tf.device('/gpu:0'):
a = tf.constant([1.0, 2.0, 3.0, 4.0, 5.0, 6.0], shape=[2, 3], name='a')
b = tf.constant([1.0, 2.0, 3.0, 4.0, 5.0, 6.0], shape=[3, 2], name='b')
c = tf.matmul(a, b)

with tf.Session() as sess:
print(sess.run(c))

If this script runs without giving any error you are using gpu version.

[Solved] Dual boot Windows 10 + Ubuntu 16.04 in HP OMEN

The PC I was working with has 2 hard disks. One of them was using Windows 10 and the other one was used as an additional storage. I burned Ubuntu 16.04.4 using Rufus (default configuration, including the partition scheme) on a USB Drive. I shrank the second drive so that I had around 900 GBs unallocated, and when I installed Ubuntu I chose “Install along with Windows”. It automatically installed it there. As a result, I got 2 EFI partitions: the one that I had before (windows) and a new one in the second drive. Finally, to make all of this work, I had to go to the BIOS (F10) and disable Secure Boot and change the order (first ubuntu, second windows).

[Solved] Lenovo Y700 dual boot (Windows 10 and Ubuntu 16.04)

After my screen mysteriously stopped working properly, I brought my computer to the shop where I bought it and Lenovo replaced my screen successfully without any extra cost (except for the fact that I had to go to other country twice). Well, for some reason, they thought it would be a good idea to format my PC that previously had Windows and Ubuntu, but even if the Ubuntu partitio was there, I couldn’t access. Anyway, I decided that it was a good idea to format Ubuntu, but it was not as straightforward as I would had liked and I read about many different solutions, so I will just write mine and hopefully it will be useful to someone.

Step 1: Create a bootable USB choosing “GPT partition scheme for UEFI”. I used the Ubuntu 16.04.2 LTS amd64 iso.

Step 2: Go to the BIOS screen (press F2 very fast when booting) and go to “Boot”. Boot mode: UEFI. Fast boot: Disabled. USB Boot: Enabled. Go to “Security”. Secure Boot: Disabled.

Step 3: Reboot the computer with the USB plugged in. If you can’t boot from the USB go to the BIOS and on “Boot”, EFI section, move the USB up to be the first one to boot. If not, it might not boot and might boot Windows instead (this happened to me all the time).

Step 4: Install Ubuntu and enjoy.

TwitterFingerprinting tool for Python (library)

Long ago, around 4 years ago already, I implemented a Twitter Fingerprinting tool in PHP that was available for everybody which unfortunately stopped working when the API changed. I was really excited because I could also help the Spanish police with another version of this online tool.

Recently, I decided to implement something similar in Python, but with a considerable difference: not using the Twitter API. There are many reasons:

  • Due to the own Twitter API limitation, you cannot use the application intensively. I do not know the limit nowadays, but long ago it was around 150 requests per hour and IP.
  • I do not usually like that the guys of Twitter know what I am doing with the API.
  • If you use the API, you have to make an account, and use certain credentials. Some people may not like this.
  • Less flexibility. With the API you only can do what you can only do. Obviously.

On the other hand, the basic disadvantage of not using the API and parsing code with regexps directly is that a small change in their website will make the code not work properly.

After saying this, here is the Github link of this small library where you can find more information.

An example of how to use it:

Get all the images uploaded from a specific user:

from TwitterFingerprint import TwitterFingerprint
tw = TwitterFingerprint("google")
tw.obtainLastTweets() # Get all tweets
tw.getPicturesLinks(savePath="images/",includeRTs=0)

Get the language, hashtags, and text (tweet) of the last 30 tweets:

from TwitterFingerprint import TwitterFingerprint
tw = TwitterFingerprint("google")
tw.obtainLastTweets(limit=30,verbose=False)
for tweet in tw.tweets:
	print(tweet["lang"],tweet["hashtags"],tweet["text"])

Get three histograms (months, weekdays, hours) of the last 500 tweets. Interesting when analyzing when someone is using Twitter.

from TwitterFingerprint import TwitterFingerprint
tw = TwitterFingerprint("google")
tw.obtainLastTweets(limit=500)
[histMonths,histWeekdays,histHours] = tw.getHistograms()

NHK Web Easy Reader with direct dictionary content retrieval

As a Japanese language learner, any tool that makes this difficult journey easier is always welcome. I do not want to debate anything about the learning process, so I will just say that, as with any other language, the “reading” skill is very useful as a proof of understanding both grammar and vocabulary. For this reason, everyday I have to say “thank you” for the guys of NHK Web Easy, who upload news in very simple Japanese (the grammar is very simple, the vocabulary is something around “medium level”).

When I go to the university I always read on the metro as many news as I can, but very often I have to switch back to my dictionary because I do not have certain words in my vocabulary. This event makes the reading task more difficult because during the “long” process of memorizing the word (reading+writting), minimizing the browser, opening the dictionary, writting the word and understanding it, I usually forgot what I was reading before. And it is not a matter of memory. When you are reading in a language you are not good at, it is extremely difficult to keep track of everything, especially in Japanese where the grammar is absolutely different from any European language (even more different than Finnish).

Therefore, I decided to make a tool to avoid all those previously mentioned steps (except for the “understanding part” of course). This tool allows me to read very fast and make the reading way more pleasant. I called this tool “NHK Reader” and, in a few words, is a language parser tool.

Steps:

  1. Takes the text from the news
  2. Uses jisho.org to separate the words (POS tagging)
  3. Uses jisho.org to get the meanings of the words
  4. Pastes that into the webpage (using jQuery)

POS tagging is not something easy, so it does not detects all words correctly and, sadly, I cannot do anything about that since I take the output from jisho.org

A couple of screenshots

GHJWAXNq YYX98bS3

This tool is parsing directly from jisho and nhk, so the regular expressions are hardcoded and it might fail if the owners decide to change the HTML code, but it should not be difficult to fix.

The code will be available on my github when the version 1.0 is ready.

[Solved] OpenCV + Python, error “DLL load failed: The specified module could not be found”

My computer:
Windows 10, Python 3.4, OpenCV 3.0.0

I had uncountable desperate attempts to install OpenCV 3.0 in my machine, including the always last plan when installing software: building it from the source. There is an apparently nice tutorial from the official OpenCV webpage which didn’t work for me because I needed to do a couple of steps, so please, try to follow this tutorial (section Building OpenCV from source) with this addition tips:

  • 7.2: Use the path you want, but remember that you will not be able to delete it (because you need to refer to that path) so choose wisely.
  • 7.4: You can use any Visual Studio. In fact, I used Visual Studio 13. Just remember to specify it when configuring CMake
  • 8,9,10,11: When you are checking and unchecking all those checkboxes you will realize that many of the options are not listed on the provided pictures. What to do in that case? Easy: just leave it there as it is.
  • 16: Some of the projects will not be built and will be skipped. Don’t worry.

Now, it’s supposed to be installed in your computer, and if you try to import cv2, it should work.
However, at least for me, it didn’t work. The final step to get rid of that annoying message is to add the appropiate path to the PATH system variable. This is the path that you have to add: X\bin\Release where X is the folder where you compiled it.

I hope this is helpful. This could have saved me many hours…

My personal notes on “Machine Learning: An Algorithmic Perspective”

Since Machine Learning and, in general, Artificial Intelligence became my favorite subject, I have spent a lot of time learning about it by myself. I consider that a good, readable and pleasant book can be key in learning about such difficult topics. I have to say that I started reading which probably is the most famous book in this issue: Machine Learning and Pattern Recognition (Bishop), but I failed at finishing it. Plenty of maths, abstract concepts and no real examples make this book very tough, in my opinion. I think this book collects and admirable amount of work and may serve as a great reference, but in order to fully comprehend and learn from an undergraduate background, it can be hard.

Because of the lack of examples, I tried to find a book with examples in some programming language, as Machine Learning: An algorithmic Perspective does. However, I didn’t like it very much neither, because it uses Python classes that you cannot see them from inside. A quite understandable argument is that you don’t really need to understand how it compeltely works from inside in order to understand the general idea of some algorithms, but I think that the only way to understand how an algorithm works is by programming it.

I tried to read each chapter of this book carefully and spending a lot of time researching, reading papers, watching Youtube videos to help me to understand concepts and of course writting down some notes. I have decided to publish all the stuff I’m doing, from personal written notes to source code because it may help more people who are reading this book or who simply try to understand specific concepts.

As I don’t want to write a very long post about it, this entry will serve as an index and for each chapter I consider interesting, I will write a post uploading my own stuff and giving some explanations.

Machine Learning: An Algorithmic Perspective
1.-Introduction
2.-Linear discriminants
3.-The Multi-Layer Perceptron
4.-Radial Basis Functions and Splines
5.-Support Vector Machines
6.-Learning with Trees
7.-Decision by Commitee: Ensemble Learning

2.-Linear discriminants

Downloads: perceptron.pdf, activation.m, NN2outputs.m, NNand.m
Contents: Transfer function, Why bias is needed?, Learning rate, examples, Matlab code.

3.-The Multi-Layer Perceptron

Downloads: MLP.pdf, NN231.m
Contents: Backpropagation, Multi-Layer Perceptron
Further study: Create a general algorithm to use a NN with N inputs, M layers, P nodes, Q outputs.

4.-Radial Basis Functions and Splines

Downloads: kmeans.pdf, kmeans.m
Contents: K-Means algorithm
Further study: Go back to this section in a future to better understand it. Study more about splines.

5.-Support Vector Machines

Downloads: SVM.pdf
Contents: SVM algorithm explained, Non-linear SVM, several examples
Further study: Implement this efficiently in Matlab, learn more about Non-linear SVM, learn how to find support vectors among all others automatically

6.-Learning with Trees

Downloads: Trees.pdf
Contents: Example of Decision Tree (classification)
Further study: Learn/implement C5.0 algorithm, and CART (for regression).

7.-Decision by Commitee: Ensemble Learning

Downloads: Adaboost.pdf
Content: Adaboost formulae and 2 examples
Further study: implement Adaboost in Matlab, example of bagging and Mixture of experts

Artificial Intelligence

I temporaly decided to stop writing about general stuff and focus on Artificial Intelligence. Because of this, I opened a new WordPress blog in a subdomain of mine –> http://laid.delanover.com.

Neural Networks, Image Processing, [Un]supervised learning, and so on. I also decided to share every piece of code uploading it to my personal github repositories which can be found in the new blog.

Sumobot Project

This is not even close to the super cool Japanese Robo One robot competitions, but close enough. Sumobot competitions consist of a duel between two robots which have to push each other to make the other leave the arena. There are some specifications that must be followed such as dimensions and weight among others, but the rule is simple: the other robot has to leave the arena.

images

The arena is basicly a black circle within a white margin. This white margin is important because it will help the robot to know where the boundary is.

27400a

In our class we are using these robots which you have to build them up using components you can see there, called Sumobot. I would like to remark the most important parts:

  • 2 Servo motors
  • 2 Infrared LEDs
  • 2 Infrared readers
  • 2 QTI sensors (to detect the boundary)

By default, if we follow Sumobot’s instructions, we would use its serial port to transfer our programs to its core, but we’re using instead an AVR Butterfly (ATMega 169).

Servo motors are connected to timer counter 1 pins (ports PB5 and PB6) which will output the corresponding signal to make the wheels move.
QTI readers and Infrared readers are connected to other pins (PB0, PB1, PB2 and PB3). In case of QTI readers, when they detect white, the pin will be set to zero, otherwise it will be set to 1. In case of Infrared readers, when they detect an obstacle, the pin will be set to 0, otherwise it will be set to 1.
Infrared LEDs are connected to timer counter 0 pin (port PB4) which is set to a frequency of 38.5 KHz. This frequency is not arbitrary since the Infrared reader is only able to properly read reflected infrared signals under that frequency.

Here we can watch several videos about how it works

Project Work – Home Media Center

Index
1.-Introduction
1.1.-Quick Description
1.2.-Why this Home Media Center is so cool?
1.3.-Video Presentation
2.-Install
2.1.-First steps
3.-Wiki
4.-Skills acquired
5.-License

1.-Introduction

This is my Final Project Work (a project we have to do when we finish our bachelor). One of the reasons why I chose this to be my project was because I wanted to develop something that you can use. As I like theoretical stuff, it would have been interesting to invest my time researching about some nice topic, but actually, it wasn’t 100% up to me because since I’m doing an exchange abroad, I need to get credits in my home university and we all decided the topic of my project. Still, I’m quite happy with the results because in the end I could develop something interesting, I could use some knowledge I had about the topic (and some code) and, of course, I learned.

1.1.-Quick Description

I developed a HMC (Home Media Center) which is able to play media files using a Raspberry Pi as a server.
After you install the script in the RPi, you can directly plug the TV cable to it and start using it. It can read USB devices and shared folder across the network.

1.2.-Why this Home Media Center is so cool?

Well, it’s not so cool, and the GUI has to be improved (//TODO), but I developed something I didn’t find in other home media centers. I’m using a wireless dongle which is connected to the USB port, this way, the RPi can check wireless networks and connect to them as well. This is really convinient since not all people have the TV screen next to the router, so it’s more clean and comfortable to use wireless technology. Anyway, depending on your wireless dongle and router (and in general, the wireless conection quality) you will be able to play some certain files depending on the bit/s needed to play them. If your router and the Pi are very far, the connection quality will be poor and not high definition files will be able to be played.

Didn’t you understand? In a few words: you can have your Pi connected to the TV and your router, and play files located in any other device in the same network.

This three diagrams will ilustrate better what you can do:


We can actually make more complex diagrams such as connecting a switch to the RPi and so on. This is really flexible.

1.3.-Video Presentation

Video: https://www.youtube.com/watch?v=m0QRhsXRhoU

2.-Install

In a few words: Install Raspbian and update it, download the code and run install.sh. Finally, change some settings and reboot it.

During the installation process it will ask us twice (or three times actually) for a MySQL password. Please, write root. The first and second time you will write this will be when installing the database itself (password and confirmation). The third time will be when updating the database. If you don’t write root, the webserver is not going to work because it assumes that that password is root.


~$ sudo apt-get update -y && sudo apt-get upgrade -y
~$ wget http://old.delanover.com/projects/hmc/hmc.zip
~$ unzip hmc.zip
~$ cd hmc
~$ chmod 777 install.sh
~$ sudo ./install.sh

After this is finished, now we need to not get any pop up when inserting an USB device. For this, it is needed to go to the file manager (next to the Start button), in to the toolbar click on “Edit”, “Preferences”, go to “Volume Management” tab, and uncheck “Show available options for removable media when they are inserted”. For the future, this will be done automatically in the install.sh file.

Finally, we need to reboot it.

2.1.-First steps

First steps

3.-Wiki

As a good open source project has, I made a wiki which will be updated every time I modify or I need to clarify/specify something about the project. I think it’s the best way to fully explain how the system works and therefore encourage more people to use it and modify it. I tried to explain it as clear as possible and keep it simple.

Here is the wiki: Not available anymore.

Anyway, if you have any question, you’re free to ask me.

4.-Skills acquired

After I developed this project, I acquired and improved some skills I can proudly announce:

  • Introduction to Python.
  • More experience developing and designing web pages.
  • More experience with shell script.
  • Better understanding about Linux (startup, services, processes, …).
  • More experience about development methodologies.
  • Software testing.
  • Maintenance of a Wiki web page.

5.-License

Do whatever you want except selling it or any part of the code. This project is intended to be free and open for everybody, so people can see the code, learn, and more people can download it.