Replacing Kindle 3 screen

During my epic trip to Poland and Czech Republic with some friends an incident happened. At the half of the trip I realized that there was something wrong with my Kindle screen, but I didn’t know what was going on with it. I was thinking that probably the problem is that’s broken, but I wasn’t sure at all and I tried to restart and reset a couple of times.

When I arrived at home, I tried to find pictures of a broken screen Kindle, and it was definitely that. Now I know how a broken screen looks like.


Broken screen

I bought this Kindle around 4 years ago, and I liked it very much, even more than this non-keyboard version Kindle that we can see nowadays, so I didn’t want to buy a new one which is actually more expensive than repairing my old one. I was afraid because I haven’t opened any device like that before, but there is always a first time for everything, and the time came. By the way, nowadays I think we can buy a new Kindle for less than 100€ and I paid around 250€ for this one (it was expensive because it came from the US and I had to pay very high taxes).

Anyway, I found a screen replacement in eBay and it cost around 30€ and one month to arrive. After open the Kindle I realized I need a very small screwdriver, so I ordered a this kind of screwdriver from the Internet and another month I had to wait!


Replacement. Thanks God the instructions were there.

As I’ve never done this before, I was afraid and I searched a tutorial, and here it is: http://www.youtube.com/watch?v=ObFE8sPoXfw but actually, it’s basically this: remove screws, change screen and put them back. Actually, I can say that the most difficult part was putting on and off the plastic case. It’s very difficult and you have to be very careful.


Different parts of the Kindle.

One particular part where we have to take special care is then removing those things I marked using red color. We have to lift them up and pull back that thing they have inside. It looks like paper.

When I fully disarmed my dear Kindle, I could see that the screen was broken indeed.

Kindle broken screen, how it looks like from inside and outside

I had a very stupid problem I want to write about, so if you ever do this, charge your battery at first! When I did this the first time, it looked like it didn’t work, so I put the broken one again. After this I realized that the battery was empty, so I charged it and did it again, and


Kindle working again, aka orgasm

Robotic Arm

This project is actually university homework, but it’s so interesting that I decided to upload here the information. I’ve never used such an electronic components before and I have to admit that it was a nice challenge.

This robotic arm is composed of 5 servo motors, which must be controlled in order to use the robotic arm by a couple of joysticks. Proposed environment for this project was the following: We are in a lab dealing with toxic substances, and we need to move them using this robotic arm. Of course, end-users are not suppose to know anything about how the robotic arm is internally built, this means that they don’t have technical knowledgment about mechanics.

My solution
Using the joysticks, we are able to move the robotic arm (back-forward, up-down, left-right) and open-close its grip to catch test tubes.
Additionally, we can see the angle of each servo motor in Olimex’s display and move the robotic arm using Olimex as well. Finally, it is also possible to change the “speed” of robotic arm movements. In my opinion this was completely necessary since the robotic arm is able to move around 10kg and using low weight test tubes makes robotic arm movements so fast by default.

There is also a “security mode” which makes the robotic arm not being move incrementally. Normally when we are using joysticks, the faster we move the joystick, the faster will be moved the robotic arm. But sometimes, we require a more precise control. So, this “security mode” moves always slowly the robotic arm, independently of how fast we are moving the joysticks.

How is it constructed
Each servomotor is connected to each Olimex pin where it is possible to send signals and control them.
Joysticks are connected to Olimex’s ADC, and therefore we can measure and interpret current values.
Servomotors are plugged to 5V while Joysticks to 3.3V. Everything share the same ground.

How to control a single servo motor
I guess this depends on the manufacturer, but I also guess in all cases it’s similar. In order to control a single servo motor, it is necessary to send a signal whose frequency varies depending on the angle it is wanted to obtain. In case of this servo motors, they need 50Hz and sending a 1500ms signal they turn to the “neutral point”. From this point, we can increase and decrease the sent signal and move them from one to another side.

Wrist servo motor is special. As I said, there are 5 servo motors and using joysticks we are able to control 4 of them (up-down, left-right movements). Wrist servo motor has to be always horizontal, and this is achieved by calculanting angles of the rest of them and apply some formula to obtain desired value.

I recorded this video showing how it works: https://www.youtube.com/watch?v=Oms3afMk_NE

Ebay script remainder through Twitter

Introduction
The idea behind this project is simple: a tool which regularly reminds me when my auction (or interested item) is going to finish and its current price. I established ranges and periods of time as following:

Time left Remainder
>12h Every 12h
12h > x > 6h 1 remainder 6h before
6h > x > 2h Every hour
2h > x >30m Every 30 minutes
30m > x > 0m Every 10 minutes

For example, if I register one item whose time left is 2d 16h, the remainders will be set as:

  • 2d 12h, 2d, 1d 12h, 1d, 12h left
  • 6h left
  • 5h, 4h, 3h, 2h left
  • 1h 30min, 1h, 30min left
  • 20min, 10min left.

The register process is very easy: take the ebay ID number of the item (located in the URL), and visit a link such as: ~register.php?link=www.ebay.com/itm/IDNUMBER
After this, the script will generate cronjobs whose work will be “visit” a webpage such as: ~bot.php?link=www.ebay.com/itm/IDNUMBER and a tweet will be published after calculation current time left.
When time left is less than 15min (so, the last remainder), all cronjobs regarding to that item will be erased. This means that you can add as many items as you want.

It is also easy to change some features such as remainders period and tweet’s content.

Screenshots:
Nombre2

How my new awesome wallpaper is powered by Powershell

Introduction
Last week, in the middle of my timetable gap, waiting with my German friend for the Finnish for Exchange Students class he showed me the Apple maps application, and I really liked how you are able to see projected sunlight in Earth, and as I really liked space stuff pictures, I thought it would be nice if I’d have a dynamic wallpaper that changes automatically where I can see this, thus comparing sunlight hours between my home country and Turku (Finland), where I’m living nowadays.

At first, I saw my own skills so limited since I mostly know about PHP, C, Java, and a little bit of other programming languages. After this I made me promise to learn some day Python, but anyway, knowing about C++ would also be okey in this situation. My final decision? Powershell!

Getting down to work
I have never programmed using Powershell, and I was quite surprised how a lot of things can be done in a so easy way.
I researched about this kind of planet and sunlight images, and I found a Czech webpage where I can select coordinates and zoom, so I just adjusted this to my needs and this is the result.

As I have never programmed in PS, I researched how to change and update the wallpaper, and although it was quite easy to implement (only two lines), I decided to rely on the operating system itself (it is always suppose to have higher perfomance, rather than programming oneself the same) and the only work I did in PS is to download a couple of images which will be rotating every 5 minutes (also they are downloaded every 5 minutes).
Note: I selected a 5 minutes interval for mainly two reasons: I am not able to send too many requests to the Czech wesite, I think it’s enough and this way I don’t spend too many resources.

I’m also interested in making some kind of video where I can see the sunlight at the same hour every day, in order to see how the sunlight changes during the year, so I also programmed this in the script below.

Source code

<#
 # This function will save an image given source and destination
 # @param source of the image.
 # @param destination where the image will be saved.
#>
Function SaveImage
{
    #Get the params and cast them into strings
    $source = [string]$args[0]
    $destination = [string]$args[1]
    
    #Download it, and wait for 5min
    $wc.DownloadFile($source, $destination)
    Start-Sleep 300

}


$source = "http://www.fourmilab.ch/cgi-bin/Earth?img=learth&imgsize=1000&opt=-l&lat=50&ns=North&lon=20&ew=East&alt=2000&date=0&dynimg=y";
$wc = New-Object System.Net.WebClient
$date = Get-Date
#Name for my picture I will store in the other folder
$pictureName = "$($date.Day)-$($date.Month)-$($date.Year).jpeg"
#Other folder where I will store all the pictures to make the movie
$pictureFolder = "C:\Users\JuanMiguel\Pictures\light\"
$pictureFullPath = "$pictureFolder$pictureName"
#Where I will store the images I will use as wallpaper
$destination = "C:\Users\JuanMiguel\image"

#I will save the picture always after 19h
while($date.Hour -lt 19)
{
    SaveImage $source "$($destination)1.jpeg"
    SaveImage $source "$($destination)2.jpeg"
    #I take the date again
    $date = Get-Date
}

#Check if that picture exists, otherwise I will save it
if(!(Test-Path $pictureFullPath))
{
    SaveImage $source $pictureFullPath
}

#Endless loop
while(1)
{
    SaveImage $source "$($destination)1.jpeg"
    SaveImage $source "$($destination)2.jpeg"
}

As PowerShell is a high level programming language (very high indeed), I tried to program the script in a non-traditional way, checking the less information as possible. Of course, it would have been cleaner if I’d only used one infinite loop asking all the time about the hour and checking if the image I want to save exists, but that way I have to ask many times to the computer, therefore, more work, more wasted resources, less battery, etc. Sometimes it’s better to think more about the performance and less about how easy to read the code is, mainly when we have so simple code like this.


17h and almost dark.. but winter will be fun!

Current project: Wireless Music Player

Since the beginning of this year, I’ve been working on a Wireless Music Player. The goal of this project is play all music in a Server while you can control everything from any Client. For the controls, I used PHP because is compatible with any kind of device, from computers to handy devices.

I had to configure many things in the server to make it run without any help, so I only have to turn it on. After this, the server itself creates automatically a hotspot where an additional device can connect to and play anything. The way to play any song is so simple. At first, I have to put the songs I want in a folder (which can have subfolders). After this, I have to create playing lists and add songs. Then, I can play the full playlist.

This project is not finished at all. I would like to improve it, and add many additional features to make it more awesome. At this moment I don’t have many free time so it’s so difficult to work on it, but one of my main goals is use a Raspberry Pi and deploy this on it. This will be difficult, because as I said, I configured many things in the server side and probably I will encounter with many troubles when I want to do the same things. What a challenge!

Here is a sample video where you can see how this actually works. So simple!

Olimex ATmega128 plays Guitar Pro tabs

Little introduction
In my current university (TUAS, Turku University of Applied Sciences, in Finland) we were given a development board called Olimex. The university borrowed us the board, and I really appreciate the idea, because that movement allows students to learn themselves (if they want of course) and get the first (and second, and third..) touch with this board.

In my case I didn’t played with this kind of boards in my life. Actually I bought an Arduino board in order to learn about electronics and stuff, but I didn’t touch it because my lack of free time during this summer, so I want to do my best with this board.

My void background
In class we learned how to play different sounds. Of course, at the end, the cleaning programming style allowed us to make some clear and clean function to play a note, like:

playNote(DO)

where DO (RE, MI, and so on) are pre-defined constants (frequencies). But, I wondered if I could do more, and something more interesting, because if I wanted to play a melody I had to call that playNote function as many times as needed, and I couldn’t adjust even the time I want to play the melody.

As I have a very little background as music player (keyboarder!) I used a lot Guitar Pro, and the first thing I though was whether I could use it in order to obtain the melody I want to play in my board. And of course, I did!

Program itself
Part 1
This is the structure of my program:
-notes.h –> pre defined constants. Here I defined the notes as A1,B1,C1..E5,F5,G5.. where the letter means the note itself and the number means the octave. The content of each constant is its own frequency.
-playMax.h –> this is just the constant which represents the amount of notes to be played. One single line.
-playMelodies.h –> this is the melody represented as an array: int mel[max_mel] = {A3,D4,A3…
-playTempo.h –> this represents the time a note has to be played: double temp[max_mel] = {0.50,0.25
-melody.c –> main program. Here I play all the notes of the melody using a loop and calling a function play_note(frequency,duration).

The reason I took off the amount of notes to be played, the notes to be played and the time for each one, is that I only have to change this files to change the melody I want to play, so the program itself remains the same.

Additionally, I made this program customizable and I can change the offset in order to play a melody more high-pitched or low-pitched, and faster or slower.

Part 2
Guitar Pro allows us to export a XML version of the partiture, so I only needed to built up a parser, an make the files I need for the melody (playMax.h, playMelodies.h, and playTempo.h).
I built this parser in C because I wanted something efficient and recall about this wonderful (and painful some times) programming language.

Building a XML parser is easy (theoretically at least), and the Guitar Pro XML output is particularly easy to understand.
The most important structure was:
note
--step
--octave
--duration
note

How to make this works
-Download the Guitar Pro partiture of the song I want to play (there are thousands on the Internet)
-Export the XML version of that partiture.
-Run the parser which will make the corresponding headers.
-Compile the program and introduce it in the board.
-Play!

Some videos:
Elfen Lied opening
Ievan Polkka
Ode to Joy

Login en Linux y caracteres no imprimibles

En una de las preguntas que teníamos que hacer en clase para un ejercicio de la asignatura de Seguridad Informática, se nos preguntaba acerca de las contraseñas en Linux (expiraciones, limitaciones, …) Al final resultó ser más entretenido que un simple y típico chequeo, con un final interesante y curioso, al menos para mi, es por eso que lo publico. He buscado un poco y no he visto ningún documento que lo recoja, así que me parecía interesante escribirlo.

Toda la historia tiene como centro al comando passwd, que es el que nos permite cambiar la contraseña de nuestro usuario actual. Su funcionamiento es simple: escribimos passwd, introducimos la contraseña actual, e introducimos dos veces la nueva contraseña. Nada nuevo.

Hay varios conjuntos de contraseñas que no podemos poner, ya porque sean simples, fáciles, etc. De hecho, estos son algunos de los errores que nos pueden dar si tratamos de introducir algunas contraseñas.

Este es un extracto del man del passwd.

Then, the password is tested for complexity. As a general guideline,
passwords should consist of 6 to 8 characters including one or more
characters from each of the following sets:

·   lower case alphabetics
·   digits 0 thru 9
·   punctuation marks

Care must be taken not to include the system default erase or kill
characters.  passwd will reject any password which is not suitably
complex
.

Tal y como pone, nos podriamos imaginar que el passwd tiene las restricciones que ahí nos puede hacer entender que tiene. Sin embargo, lo interesante viene cuando lo hacemos con el sudo. En este caso, básicamente, se lo traga absolutamente todo. Fuimos probando los palíndromos que antes no nos dejaba poner, y signos raros, y si, se podía meter de todo.

El caso es que, después de probar a meter todo tipo de símbolos, probamos incluso a teclear Esc, RePag, AvPag.. y sorpresa, también se los tragaba. Es decir, podíamos tener un usuario que para loguearse necesitara que introdujeses 7 veces Esc. ¿Qué “problemas” trae esto? Principalmente, que en el entorno gráfico es imposible loguearte. No hay manera de introducir esto, pues cuando le damos a Esc, deselecciona el usuario, y con AvPag y demás, simplemente no mete nada.

Lo primero que pensamos fue que no tenía nada sentido, ya que cuando estamos en el entorno gráfico de un sistema operativo o incluso en la propia terminal, si pulsamos Esc no pasa absolutamente nada. Pero me vinieron a la mente el concepto de los caracteres no imprimibles, y buscamos en una tabla ASCII a ver.

Y exáctamente ahí lo teníamos. Esc es un carácter no imprimible, y de alguna forma se metía. Importante decir que los caracteres no imprimibles se los traga sin el sudo.

Después de llegar a esta conclusión, comprobamos esta teoría de manera muy sencilla.

cat > prueba
Ahí pulsamos Esc una vez, y luego lo cerramos. Abrimos con el vi, lo ponemos para que se muestre en hexadecimal (:!%xxd) et voilá. Ahí tenemos a nuestro 1B (Esc).

Como curiosidad y con respecto al error del palíndromo. Un palíndromo es una palabra que se lee igual a ambos lados. Insisto en el concepto palabra, porque si ponemos de contraseña 3avpag+2repag+3avpag no nos dice que sea un palíndromo (aunque técnicamente lo sería). Si después de tener esta contraseña se nos ocurre escribir 2repag+3avpag, nos salta el error de “New password is just a wrapped version of the old one”. Si todo esto lo hacemos con letras (sin ser un palíndromo) nos diría “New and old password are too similar”. Curioso ¿no?

JMReversi

This entry is about JMReversi, a free implementation of classic Reversi. At this moment, this application is not in the Store but hopefully will be available soon, because I didn’t have any problem validating it locally.

My personal reason to develop this application is to implement Alfa-Beta algorithm.

My idea is release some day another version with more features that are currently half developed, but now I don’t have time so I decided release it.

Any comment and suggestion is well appreciated.

Windows Store

General features

Version 1.0

  • Play classic Reversi game.
  • Computer decissions are based on Alfa-Beta algorithm.

Screenshots

JMTwitter

This entry is about JMTwitter, a free Twitter client for Windows 8 (metro style) I’m currently developing. At this moment, the application is not published in the official store (in fact, has been rejected because didn’t pass performance tests, therefore I need to improve it, sure).

I think I will also release the source code when I finish to comment it and have time for that. I would like to continue developing this application and all comments and suggestions will be well appreciated.

General features

Version 1.0

  • Visualize your timeline, mentions and trending topics (refresh every minute).
  • Automatically stores your timeline and mentions to visualize offline.
  • Send tweets and replies.
  • Automatic splited tweets and replies.
  • Snapview mode.

Screenshots

External libraries (credits)

  • LinqToTwitter by Joe Mayo is the library used to interact with Twitter service itselft.
  • SQLite-net by Frank Krueger is the library used to store timeline tweets to have them available offline.

Creando un servidor de OpenStreetMap en Ubuntu 10.04

Índice
1.-Introducción
2.-Empecemos
3.-Preparando la base de datos
4.-Instalando la libreria Mapnik
5.-Instalando las fronteras del mapa
6.-Renderizado del primer mapa
7.-Troubleshooting

1.-Introducción

Primeramente, me gustaria agradecer a “rw”, el autor del post en el que este post está basado. Este post está basado en un 95% en este otro (actualmente no está disponible, pero puedes verlo aquí).

Mi principal intención es divulgar este post a todos mis lectores y almacenar esta información acerca de la plataforma OSM para que al menos haya una referencia online para todos (y por supuesto, para mi). Este post no trata acerca de una introducción ni información acerca de OSM, sino que es información técnica para construir tu propio servidor OSM. También me gustaria mejorar mi conocimiento acerca de este servidor (no simplemente descargarlo, instalarlo y correrlo, estaría bien tratar de entenderlo).

No copiaré y pegaré el mismo contenido del post, porque (como una instalación grande ordinaria) tuve problemas instalando esta plataforma y los he resuelto, por lo que escribiré acerca de lo que he visto, resuelto y conclusiones personales. También iré un poco en profundidad acerca de algunos comandos y demás, cuya explicación si que la dejaré inglés.

2.-Empecemos

Actualiza tu sistema

Por razones de seguridad, está recomendado actualizar el sistema, aunque no es necesario.

sudo apt-get update
sudo apt-get upgrade

Algunas herramientas del sistema

sudo apt-get install subversion autoconf screen munin-node munin htop

Subversion: we’ll use it to donwload files from some repositories.
Autoconf: software to generate autoconfig scripts.
Screen: Screen is a full-screen window manager that multiplexes a physical terminal between several processes, typically interactive shells.
Munin-node: software to monitoring our server from the client.
Munin: client of munin-node.
Htop: software to check and monitoring the system used resources.

Organicemos el sistema de archivos un poquito

cd ~
mkdir src bin planet

  • src: source de mapnik.
  • bin: aquí tendremos los scripts para generar la imagen del mapa y cargar la base de datos.
  • planet: planeta (o una porción) de la base de datos que vamos a construir.

Obten el último fichero del planeta (OSM file)

En esta parte, vamos a descargar la base de datos del mundo entero (actualmente [20 dic 2012] pesa 24GBs) o quizás podemos descargar no el mundo entero sino una porción de éste. Simplemente para probar, elegiré descargar una porción.

cd planet
wget http://planet.openstreetmap.org/planet-latest.osm.bz2

3.-Preparando la base de datos

Aqui vamos a descargar postgresql para meter nuestra base de datos ahi, incluyendo algunas librerias para poder usarlo.

sudo apt-get install postgresql-8.4-postgis postgresql-contrib-8.4
sudo apt-get install postgresql-server-dev-8.4
sudo apt-get install build-essential libxml2-dev
sudo apt-get install libgeos-dev libpq-dev libbz2-dev proj

Build-essential: This package contains an informational list of packages which are considered essential for building Debian packages.
Libxml2-dev: Very useful if you wish to develop your own programs using the GNOME XML library.
Libgeos-dev: GEOS provides a spatial object model and fundamental geometric functions. It implements the geometry model defined in the OpenGIS Consortium Simple Features Specification for SQL.
Libpq-dev: Header files and static library for compiling C programs to link with the libpq library in order to communicate with a PostgreSQL database backend.
Libbz2-dev: Static libraries and include files for the bzip2 compressor library.
Proj: Standard Unix filter function which converts geographic longitude and latitude coordinates into cartesian coordinates, by means of a wide variety of cartographic projection functions.

Instalar osm2pgsql del repositorio

Primero descargamos osm2pgsql del repositorio, y depués, lo configuramos. osm2pgsql es un programa que convierte datos de OpenStreetMap en bases de datos para PostgreSQL

cd ~/bin
svn co http://svn.openstreetmap.org/applications/utils/export/osm2pgsql/
cd osm2pgsql
./autogen.sh (Error?)
./configure
make

Configurando la base de datos de PostGIS

Editamos /etc/postgresql/8.4/main/postgresql.conf para modificar/añadir 4 lineas. Estos cambios ayudarán a usar grandes cantidadesd e datos.

107: shared_buffers = 128MB # 16384 para versión 8.1 y anteriores
170: checkpoint_segments = 20
(nueva línea): maintenance_work_mem = 256MB # 256000 para versión 8.1 y anteriores
387: autovacuum = off

Editamos /etc/sysctl.conf

(nueva línea) kernel.shmmax=268435456

Recuerda que lo anterior solo tiene efecto después de reiniciar. Para que tenga efecto inmediatamente realizaremos lo siguiente.

sudo sysctl kernel.shmmax=268435456

Reiniciamos postgres para habilitar los cambios.

sudo /etc/init.d/postgresql-8.4 restart

Creamos una base de datos llamada “gis”. Algunas de nuestras herramientas suponen el uso de ese nombre en la base de datos, por lo que si elegis otro nombre, tenedlo en cuenta. Lo mismo para “username” con el usuario creado. Este deberia ser el nombre de usuario que va a renderizar los mapas con mapnik
Nota del autor de delanover: Tuve problemas con el nombre de usuario, por lo que decidi usar el mismo que en el ordenador.

sudo -u postgres -i
createuser username # responder ‘yes’ para que sea superusuario
createdb -E UTF8 -O username gis
createlang plpgsql gis
exit

Configuración de postgis en la base de datos postgresql

psql -f /usr/share/postgresql/8.4/contrib/postgis.sql -d gis

Deberia responder con algunas lineas y acabar en


CREATE FUNCTION
COMMIT

Sustituir tu nombre de usuario por “username” en las siguientes lineas. Este deberia ser el que va a renderizar los mapas con mapnik, como dijimos anteriormente.

echo “ALTER TABLE geometry_columns OWNER TO username; ALTER TABLE spatial_ref_sys OWNER TO username;” | psql -d gis

Deberia devolver

ALTER TABLE
ALTER TABLE

Activamos intarray

psql -f /usr/share/postgresql/8.4/contrib/_int.sql -d gis

Deberia devolver varias líneas acabadas en


CREATE FUNCTION
CREATE OPERATOR CLASS

Configuramos el Set the Spatial Reference Identifier (SRID) en la nueva base de datos.

psql -f ~/bin/osm2pgsql/900913.sql -d gis

Deberia devolver

INSERT 0 1

Cargamos el planeta en la base de datos con osm2pgsql

cd ~/bin/osm2pgsql
./osm2pgsql -S default.style –slim -d gis -C 2048 ~/planet/YourFileMap.osm.bz2 (Error?)

Nota: cargar 8.4GB lleva 30 hours, y particularme 1.4GB me llevaron 8 horas (depende de la velocidad de E/S), por lo que sé paciente.

Completed planet_osm_roads
Copying planet_osm_polygon to cluster by geometry finished
Copying planet_osm_line to cluster by geometry finished
Creating indexes on planet_osm_polygon finished
All indexes on planet_osm_polygon created in 4257s
Completed planet_osm_polygon
Creating indexes on planet_osm_line finished
All indexes on planet_osm_line created in 5053s
Completed planet_osm_line
Stopped table: planet_osm_ways in 16095s
Osm2pgsql took 29436s overall

4.-Instalando la librería Mapnik

sudo apt-get install libltdl3-dev libpng12-dev libtiff4-dev libicu-dev
sudo apt-get install libboost-python1.40-dev python-cairo-dev python-nose
sudo apt-get install libboost1.40-dev libboost-filesystem1.40-dev
sudo apt-get install libboost-iostreams1.40-dev libboost-regex1.40-dev libboost-thread1.40-dev
sudo apt-get install libboost-program-options1.40-dev libboost-python1.40-dev
sudo apt-get install libfreetype6-dev libcairo2-dev libcairomm-1.0-dev
sudo apt-get install libgeotiff-dev libtiff4 libtiff4-dev libtiffxx0c2
sudo apt-get install libsigc++-dev libsigc++0c2 libsigx-2.0-2 libsigx-2.0-dev
sudo apt-get install libgdal1-dev python-gdal
sudo apt-get install imagemagick

Libltdl3-dev: A small library that aims at hiding the various difficulties of dlopening libraries from programmers. It is a system independent dlopen wrapper for GNU libtool.
Libpng12-dev: Library implementing an interface for reading and writing PNG format files.
Libtiff4-dev: Library providing support for the Tag Image File Format (TIFF), a widely used format for storing image data. This package includes the development files, static library, and header files.
Libicu-dev: ICU is a C++ and C library that provides robust and full-featured Unicode and locale support. This package contains the development files for ICU along with programs used to manipulate data files found in the ICU sources.
Libboost libraries: Boost provides free peer-reviewed portable C++ source libraries.
Python libraries: So obvious.
Libfreetype6-dev: This package contains all supplementary files (static library, headers and documentation) you need to develop your own programs using the FreeType 2 library (digital typography library).
Libcairo2-dev: Cairo is a multi-platform library providing anti-aliased vector-based rendering for multiple target backends.
Libgeotiff-dev: The GeoTIFF standard has been developed for reading, and writing geographic meta-information tags on top of TIFF raster.
Tiff libraries: So obvious, to work with tiff format.
Libsigc libraries: implement a typesafe callback system for standard C++. It allows you to define signals and to connect those signals to any callback function, either global or a member function, regardless of whether it is static or virtual.
Libgdal1-dev: GDAL is a translator library for raster geospatial data formats. As a library, it presents a single abstract data model to the calling application for all supported formats.
Imagemagick: software suite to create, edit, compose, or convert bitmap images.

Construimos la libreria de Mapnik desde el código fuente.

cd ~/src
svn co http://svn.mapnik.org/tags/release-0.7.1/ mapnik (Error? offline)
cd mapnik
python scons/scons.py configure INPUT_PLUGINS=all OPTIMIZATION=3 SYSTEM_FONTS=/usr/share/fonts/truetype/ (Error? boost version)
python scons/scons.py #be patient here
sudo python scons/scons.py install
sudo ldconfig

Confirmamos que la libreria Mapnik está instalada.

python
>>> import mapnik
>>>

Instalamos herramientas para Mapnik

cd ~/bin
svn co http://svn.openstreetmap.org/applications/rendering/mapnik

5.-Instalando las fronteras del mapa

cd ~/bin/mapnik
mkdir world_boundaries
wget http://tile.openstreetmap.org/world_boundaries-spherical.tgz
tar xvzf world_boundaries-spherical.tgz
cd world_boundaries
wget http://tile.openstreetmap.org/processed_p.tar.bz2
bunzip2 processed_p.tar.bz2
tar xvf processed_p.tar
wget http://tile.openstreetmap.org/shoreline_300.tar.bz2
bunzip2 shoreline_300.tar.bz2
tar xvf shoreline_300.tar

6.-Renderizado del primer mapa

cd ~/bin/mapnik
chmod +x generate_xml.py
./generate_xml.py –dbname gis –accept-none [NOTA IMPORTANTE]

NOTA IMPORTANTE: No se porqué no se ve bien el doble guión. Recuerda que es “–” (dos “-“) y no un solo “-“.

Include files written successfully! Pass the osm.xml file as an argument if you want to serialize a new version or test reading the XML

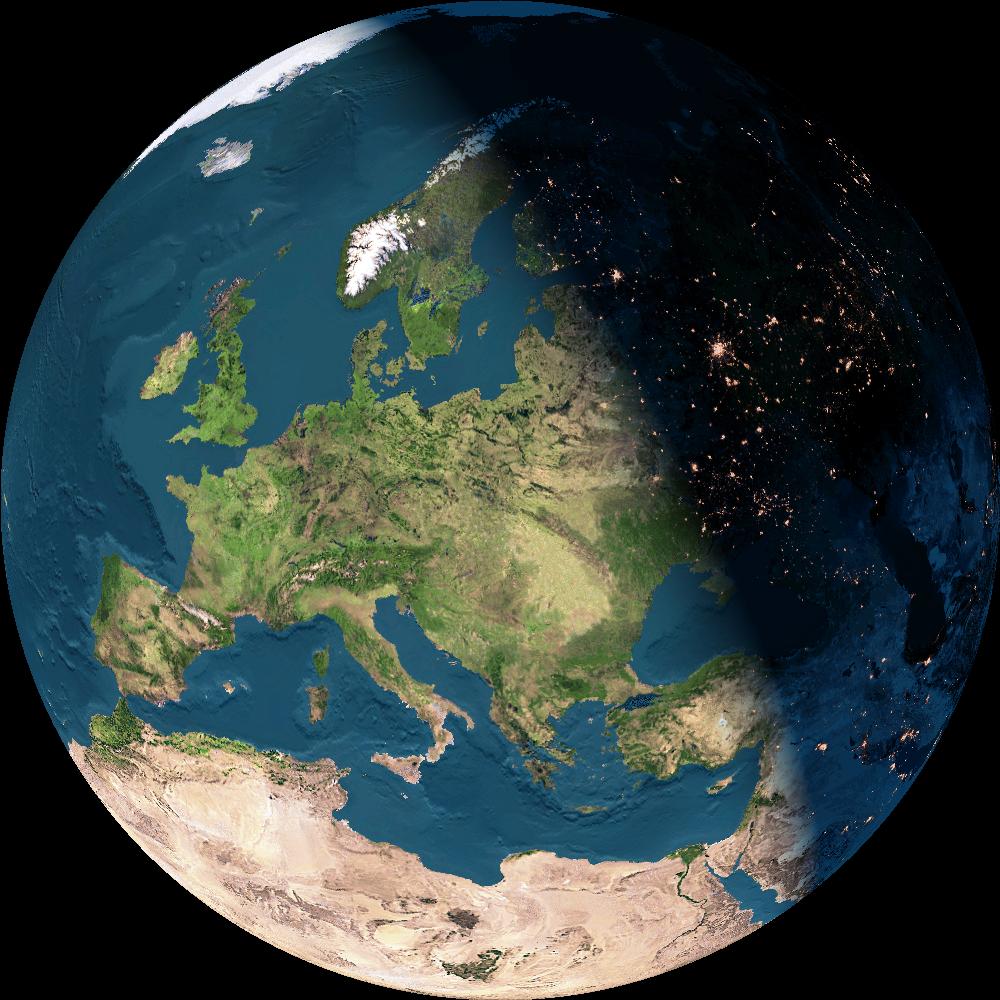
Finalmente generamos la imagen.

./generate_image.py (Error?)

El resultado será una imagen PNG de 10000x5000px de resolución del Reino Unido, en la carpeta de mapnik. Recuerda, sé paciente.

Espero que haya disfrutado de este tutorial!

7.-Troubleshooting

Error 1: Configurando al instalar osm2pgsql
Error al ejecutar ./configure cuando estamos instalando osm2pgsql:

Can’t exec “libtoolize”: No such file or directory at /usr/bin/autoreconf line 189.
Use of uninitialized value in pattern match (m//) at /usr/bin/autoreconf line 189.
autoreconf: Entering directory `.’
autoreconf: configure.ac: not using Gettext
autoreconf: running: aclocal –force -I m4
configure.ac:41: warning: macro `AM_PROG_LIBTOOL’ not found in library
autoreconf: configure.ac: tracing
autoreconf: configure.ac: not using Libtool
autoreconf: running: /usr/bin/autoconf –force
configure.ac:41: error: possibly undefined macro: AM_PROG_LIBTOOL
If this token and others are legitimate, please use m4_pattern_allow.
See the Autoconf documentation.
autoreconf: /usr/bin/autoconf failed with exit status: 1

Solution
No puedes ejecutar libtoolize, por lo que debes instalar libtool antes de continar, escribe:

sudo apt-get install libtool

Error 2: Cargando un planeta en la base de datos
Quizás tengas un error mientras estés cargando los datos del planeta:

The target database has the intarray contrib module loaded.
While required for earlier versions of osm2pgsql, intarray
is now unnecessary and will interfere with osm2pgsql’s array
handling. Please use a database without intarray.

Error occurred, cleaning up

Para arreglarlo, realizaremos un arreglo que aparece en la documentación oficial

sudo -u postgres -i -H
dropdb ptgis
### here the old database is dropped
createdb -E UTF8 -O ptuser ptgis
createlang plpgsql ptgis

# for Ubuntu <=9.10: # psql -d ptgis -f /usr/share/postgresql/8.3/contrib/_int.sql ### (do not execute this line) psql -d ptgis -f /usr/share/postgresql-8.3-postgis/lwpostgis.sql # for Ubuntu >=10.04:
#psql -d ptgis -f /usr/share/postgresql/8.4/contrib/_int.sql ### (do not execute this line)
psql -d ptgis -f /usr/share/postgresql/8.4/contrib/postgis.sql
psql ptgis -c “ALTER TABLE geometry_columns OWNER TO ptuser”
psql ptgis -c “ALTER TABLE spatial_ref_sys OWNER TO ptuser”
exit

# for Ubuntu <=9.10: sudo /etc/init.d/postgresql-8.3 reload # for Ubuntu >=10.04:
sudo /etc/init.d/postgresql-8.4 reload

psql ptgis ptuser -f osm2pgsql/900913.sql

Ahora, intentaremos cargar los datos de nuevo.

Error 3: Repositorio de Mapnik offline
Establezco esto como un error porque, quien sabe, igual algún dia vuelva a estar online. Pero ahora no lo está, por lo que debemos encontrar otro sitio para descargarlo.
Necesitamos descargar el software de git para poder descargar desde un repositorio git, y despues de eso, podremos descargar mapnik desde aquí

sudo apt-get install git-core
git clone https://github.com/mapnik/mapnik.git

Error 4: Boost version >= 1.47 required
Podemos comprobar nuestra versión de boost actual mirando en la línea 30 en el fichero /usr/include/boost/version.hpp para darnos cuenta de que no tenemos la versión 1.47 o superior, por lo que, tenemos que actualizarla. Esto no es tan sencillo como un simple apt-get install, pero es tan sencillo como: descargar e instalarlo.

Necesitamos descargar la última versión (http://www.boost.org/) (a dia de hoy, la 1.52, desde http://sourceforge.net/projects/boost/files/boost/1.52.0/). Seleccionamos el fichero tar.bz2, lo descomprimimos, configuramos y demás.

bunzip2 boost_1_52_0.tar.bz2
tar xvf boost_1_52_0.tar
./bootstrap.sh
./b2
sudo ./b2 install

Error 5: No existen algunos archivos necesarios!
Después de intentar generar la imagen (vaya suerte, justo fallando en el último paso…) se nos podria devolver el siguiente error.

RuntimeError: Shape Plugin: shapefile ‘/home/lipman/bin/mapnik/world_boundaries/110m_admin_0_boundary_lines_land.shp’ does not exist encountered during parsing of layer ‘necountries’ in Layer at line 58 of ‘osm.xml’

El único problema aquí es que necesitamos algunos archivos que no tenemos, por tanto, descarguémoslos y movámoslos a la carpeta world_boundaries para arreglarlo.

Encontré los archivos aquí. Tenemos que descargar los siguientes:

  • 110m_admin_0_boundary_lines_land.shp
  • 110m_admin_0_boundary_lines_land.dbf
  • 10m_populated_places.shp (*)
  • 10m_populated_places.dbf (*)

(*): Tenemos que renombrarlos a “ne_10m…”