Install CUDA 9.0 and cuDNN 7.2 for Tensorflow on Ubuntu 16.04

The content of this post is mostly copied from here. The reason I do this is to ensure that that really helpful post will be accessible and to add few modifications.


1. Update and dependencies

# Update apt-get
sudo apt-get update
sudo apt-get upgrade

# Install Dependencies
sudo add-apt-repository ppa:deadsnakes/ppa
sudo apt-get install build-essential
sudo apt-get install cmake git unzip zip
sudo apt-get install python2.7-dev python3.5-dev python3.6-dev pylint

# Kernel header
sudo apt-get install linux-headers-$(uname -r)

2. Install NVIDIA CUDA Toolkit

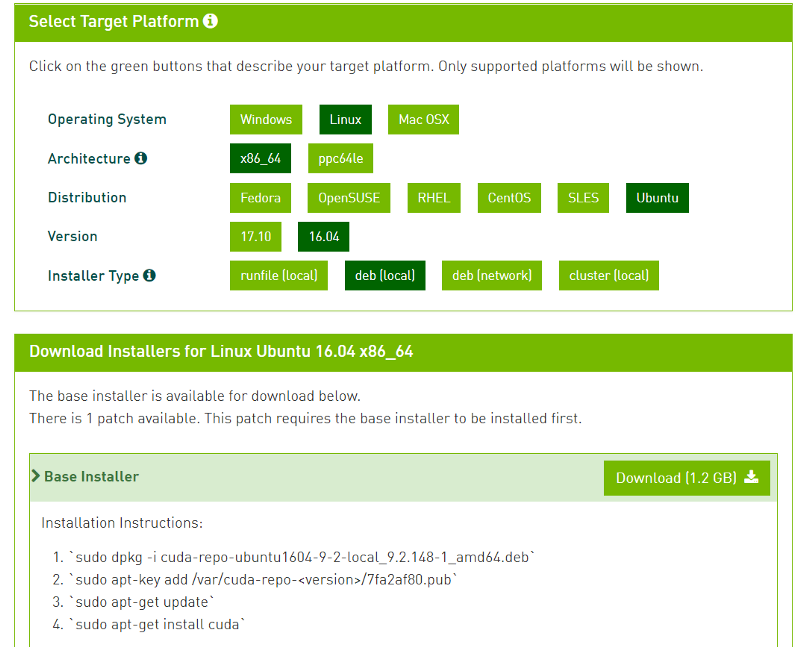
Go to https://developer.nvidia.com/cuda-downloads and download CUDA Toolkit 9.0 (Legacy) for Ubuntu 16.04. Download deb (local) which is 1.2 GB.

sudo dpkg -i cuda-repo-ubuntu1604-9-0-local_9.0.176-1_amd64.deb
sudo apt-key add /var/cuda-repo-9-0-local/7fa2af80.pub
sudo apt-get update
sudo apt-get install cuda-9.0
# Reboot
sudo reboot

vi ~/.bashrc
# add those 2 lines at the end of the file then save it
export PATH=/usr/local/cuda-9.0/bin:$PATH
export LD_LIBRARY_PATH=/usr/local/cuda-9.0/lib64:$LD_LIBRARY_PATH

Then, execute the following commands and check that nvidia-smi works.

source ~/.bashrc
sudo ldconfig
nvidia-smi

3. Install cuDNN 7.2.1

Go to https://developer.nvidia.com/cudnn, login/register, go to cuDNN Download, Archived cuDNN releases and download cuDNN v7.2.1 (August 7, 2018), for CUDA 9.0. Now, for some reason, it seems that that version of cuDNN is only available for CUDA 9.2, but we can just change the download links manually from the CUDA 9.2

cuDNN v7.2.1 Runtime Library for Ubuntu16.04 (Deb): https://developer.nvidia.com/compute/machine-learning/cudnn/secure/v7.2.1/prod/9.0_20180806/Ubuntu16_04-x64/libcudnn7_7.2.1.38-1_cuda9.0_amd64
cuDNN v7.2.1 Developer Library for Ubuntu16.04 (Deb): https://developer.nvidia.com/compute/machine-learning/cudnn/secure/v7.2.1/prod/9.0_20180806/Ubuntu16_04-x64/libcudnn7-dev_7.2.1.38-1_cuda9.0_amd64
cuDNN v7.2.1 Code Samples and User Guide for Ubuntu16.04 (Deb): https://developer.nvidia.com/compute/machine-learning/cudnn/secure/v7.2.1/prod/9.0_20180806/Ubuntu16_04-x64/libcudnn7-doc_7.2.1.38-1_cuda9.0_amd64

Install them in the right order:

sudo dpkg -i libcudnn7_7.2.1.38–1+cuda9.0_amd64.deb
sudo dpkg -i libcudnn7-dev_7.2.1.38–1+cuda9.0_amd64.deb
sudo dpkg -i libcudnn7-doc_7.2.1.38–1+cuda9.0_amd64.deb

Verify the installation

cp -r /usr/src/cudnn_samples_v7/ $HOME
cd $HOME/cudnn_samples_v7/mnistCUDNN
make clean && make
./mnistCUDNN

You should expect a “Test passed!”.

CUPTI ships with the CUDA Toolkit, but you also need to append its path to the LD_LIBRARY_PATH environment variable

vi ~/.bashrc
export LD_LIBRARY_PATH=/usr/local/cuda/extras/CUPTI/lib64:$LD_LIBRARY_PATH
source ~/.bashrc

4. Install TF and verify it works

pip install tensorflow-gpu

Run

import tensorflow as tf
with tf.device('/gpu:0'):
a = tf.constant([1.0, 2.0, 3.0, 4.0, 5.0, 6.0], shape=[2, 3], name='a')
b = tf.constant([1.0, 2.0, 3.0, 4.0, 5.0, 6.0], shape=[3, 2], name='b')
c = tf.matmul(a, b)

with tf.Session() as sess:
print(sess.run(c))

If this script runs without giving any error you are using gpu version.

[Solved] OpenCV + Python, error “DLL load failed: The specified module could not be found”

My computer:
Windows 10, Python 3.4, OpenCV 3.0.0

I had uncountable desperate attempts to install OpenCV 3.0 in my machine, including the always last plan when installing software: building it from the source. There is an apparently nice tutorial from the official OpenCV webpage which didn’t work for me because I needed to do a couple of steps, so please, try to follow this tutorial (section Building OpenCV from source) with this addition tips:

  • 7.2: Use the path you want, but remember that you will not be able to delete it (because you need to refer to that path) so choose wisely.
  • 7.4: You can use any Visual Studio. In fact, I used Visual Studio 13. Just remember to specify it when configuring CMake
  • 8,9,10,11: When you are checking and unchecking all those checkboxes you will realize that many of the options are not listed on the provided pictures. What to do in that case? Easy: just leave it there as it is.
  • 16: Some of the projects will not be built and will be skipped. Don’t worry.

Now, it’s supposed to be installed in your computer, and if you try to import cv2, it should work.
However, at least for me, it didn’t work. The final step to get rid of that annoying message is to add the appropiate path to the PATH system variable. This is the path that you have to add: X\bin\Release where X is the folder where you compiled it.

I hope this is helpful. This could have saved me many hours…

My personal notes on “Machine Learning: An Algorithmic Perspective”

Since Machine Learning and, in general, Artificial Intelligence became my favorite subject, I have spent a lot of time learning about it by myself. I consider that a good, readable and pleasant book can be key in learning about such difficult topics. I have to say that I started reading which probably is the most famous book in this issue: Machine Learning and Pattern Recognition (Bishop), but I failed at finishing it. Plenty of maths, abstract concepts and no real examples make this book very tough, in my opinion. I think this book collects and admirable amount of work and may serve as a great reference, but in order to fully comprehend and learn from an undergraduate background, it can be hard.

Because of the lack of examples, I tried to find a book with examples in some programming language, as Machine Learning: An algorithmic Perspective does. However, I didn’t like it very much neither, because it uses Python classes that you cannot see them from inside. A quite understandable argument is that you don’t really need to understand how it compeltely works from inside in order to understand the general idea of some algorithms, but I think that the only way to understand how an algorithm works is by programming it.

I tried to read each chapter of this book carefully and spending a lot of time researching, reading papers, watching Youtube videos to help me to understand concepts and of course writting down some notes. I have decided to publish all the stuff I’m doing, from personal written notes to source code because it may help more people who are reading this book or who simply try to understand specific concepts.

As I don’t want to write a very long post about it, this entry will serve as an index and for each chapter I consider interesting, I will write a post uploading my own stuff and giving some explanations.

Machine Learning: An Algorithmic Perspective
1.-Introduction
2.-Linear discriminants
3.-The Multi-Layer Perceptron
4.-Radial Basis Functions and Splines
5.-Support Vector Machines
6.-Learning with Trees
7.-Decision by Commitee: Ensemble Learning

2.-Linear discriminants

Downloads: perceptron.pdf, activation.m, NN2outputs.m, NNand.m
Contents: Transfer function, Why bias is needed?, Learning rate, examples, Matlab code.

3.-The Multi-Layer Perceptron

Downloads: MLP.pdf, NN231.m
Contents: Backpropagation, Multi-Layer Perceptron
Further study: Create a general algorithm to use a NN with N inputs, M layers, P nodes, Q outputs.

4.-Radial Basis Functions and Splines

Downloads: kmeans.pdf, kmeans.m
Contents: K-Means algorithm
Further study: Go back to this section in a future to better understand it. Study more about splines.

5.-Support Vector Machines

Downloads: SVM.pdf
Contents: SVM algorithm explained, Non-linear SVM, several examples
Further study: Implement this efficiently in Matlab, learn more about Non-linear SVM, learn how to find support vectors among all others automatically

6.-Learning with Trees

Downloads: Trees.pdf
Contents: Example of Decision Tree (classification)
Further study: Learn/implement C5.0 algorithm, and CART (for regression).

7.-Decision by Commitee: Ensemble Learning

Downloads: Adaboost.pdf
Content: Adaboost formulae and 2 examples
Further study: implement Adaboost in Matlab, example of bagging and Mixture of experts

Replacing Kindle 3 screen

During my epic trip to Poland and Czech Republic with some friends an incident happened. At the half of the trip I realized that there was something wrong with my Kindle screen, but I didn’t know what was going on with it. I was thinking that probably the problem is that’s broken, but I wasn’t sure at all and I tried to restart and reset a couple of times.

When I arrived at home, I tried to find pictures of a broken screen Kindle, and it was definitely that. Now I know how a broken screen looks like.


Broken screen

I bought this Kindle around 4 years ago, and I liked it very much, even more than this non-keyboard version Kindle that we can see nowadays, so I didn’t want to buy a new one which is actually more expensive than repairing my old one. I was afraid because I haven’t opened any device like that before, but there is always a first time for everything, and the time came. By the way, nowadays I think we can buy a new Kindle for less than 100€ and I paid around 250€ for this one (it was expensive because it came from the US and I had to pay very high taxes).

Anyway, I found a screen replacement in eBay and it cost around 30€ and one month to arrive. After open the Kindle I realized I need a very small screwdriver, so I ordered a this kind of screwdriver from the Internet and another month I had to wait!


Replacement. Thanks God the instructions were there.

As I’ve never done this before, I was afraid and I searched a tutorial, and here it is: http://www.youtube.com/watch?v=ObFE8sPoXfw but actually, it’s basically this: remove screws, change screen and put them back. Actually, I can say that the most difficult part was putting on and off the plastic case. It’s very difficult and you have to be very careful.


Different parts of the Kindle.

One particular part where we have to take special care is then removing those things I marked using red color. We have to lift them up and pull back that thing they have inside. It looks like paper.

When I fully disarmed my dear Kindle, I could see that the screen was broken indeed.

Kindle broken screen, how it looks like from inside and outside

I had a very stupid problem I want to write about, so if you ever do this, charge your battery at first! When I did this the first time, it looked like it didn’t work, so I put the broken one again. After this I realized that the battery was empty, so I charged it and did it again, and


Kindle working again, aka orgasm

How my new awesome wallpaper is powered by Powershell

Introduction
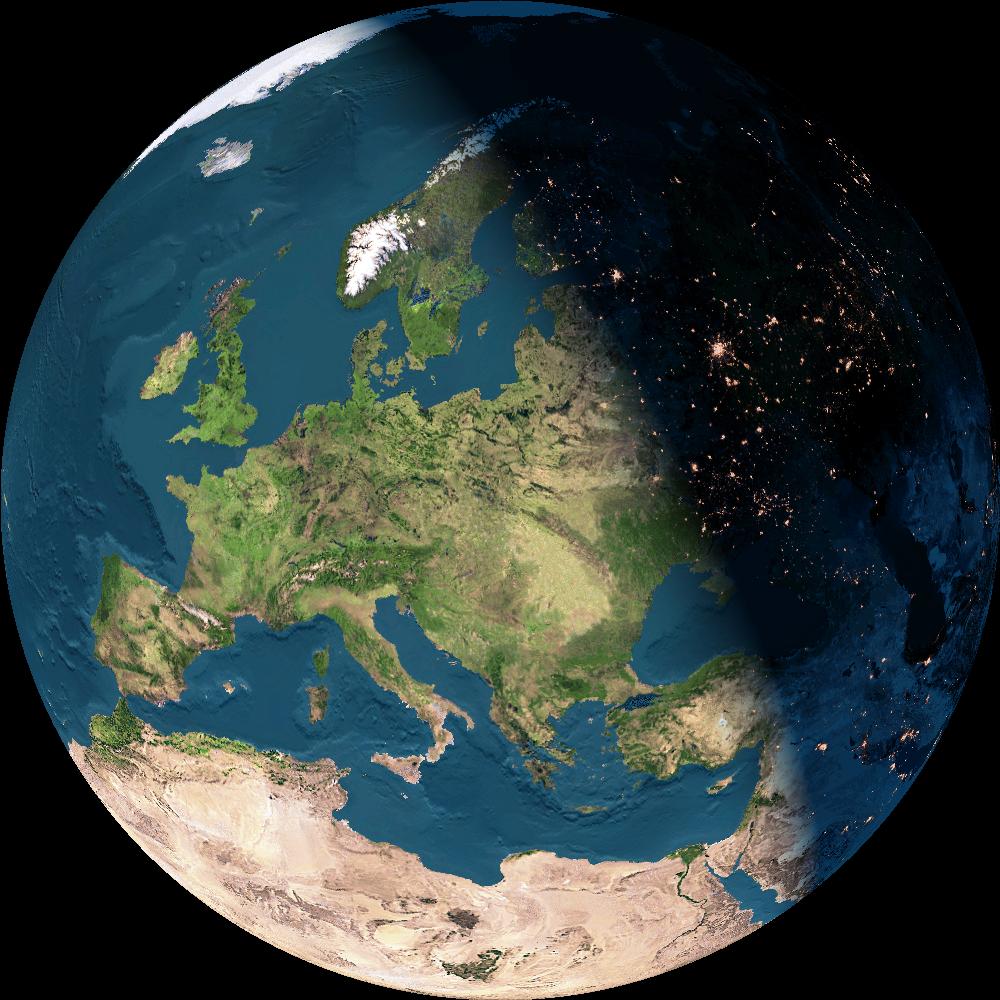
Last week, in the middle of my timetable gap, waiting with my German friend for the Finnish for Exchange Students class he showed me the Apple maps application, and I really liked how you are able to see projected sunlight in Earth, and as I really liked space stuff pictures, I thought it would be nice if I’d have a dynamic wallpaper that changes automatically where I can see this, thus comparing sunlight hours between my home country and Turku (Finland), where I’m living nowadays.

At first, I saw my own skills so limited since I mostly know about PHP, C, Java, and a little bit of other programming languages. After this I made me promise to learn some day Python, but anyway, knowing about C++ would also be okey in this situation. My final decision? Powershell!

Getting down to work
I have never programmed using Powershell, and I was quite surprised how a lot of things can be done in a so easy way.
I researched about this kind of planet and sunlight images, and I found a Czech webpage where I can select coordinates and zoom, so I just adjusted this to my needs and this is the result.

As I have never programmed in PS, I researched how to change and update the wallpaper, and although it was quite easy to implement (only two lines), I decided to rely on the operating system itself (it is always suppose to have higher perfomance, rather than programming oneself the same) and the only work I did in PS is to download a couple of images which will be rotating every 5 minutes (also they are downloaded every 5 minutes).
Note: I selected a 5 minutes interval for mainly two reasons: I am not able to send too many requests to the Czech wesite, I think it’s enough and this way I don’t spend too many resources.

I’m also interested in making some kind of video where I can see the sunlight at the same hour every day, in order to see how the sunlight changes during the year, so I also programmed this in the script below.

Source code

<#
 # This function will save an image given source and destination
 # @param source of the image.
 # @param destination where the image will be saved.
#>
Function SaveImage
{
    #Get the params and cast them into strings
    $source = [string]$args[0]
    $destination = [string]$args[1]
    
    #Download it, and wait for 5min
    $wc.DownloadFile($source, $destination)
    Start-Sleep 300

}


$source = "http://www.fourmilab.ch/cgi-bin/Earth?img=learth&imgsize=1000&opt=-l&lat=50&ns=North&lon=20&ew=East&alt=2000&date=0&dynimg=y";
$wc = New-Object System.Net.WebClient
$date = Get-Date
#Name for my picture I will store in the other folder
$pictureName = "$($date.Day)-$($date.Month)-$($date.Year).jpeg"
#Other folder where I will store all the pictures to make the movie
$pictureFolder = "C:\Users\JuanMiguel\Pictures\light\"
$pictureFullPath = "$pictureFolder$pictureName"
#Where I will store the images I will use as wallpaper
$destination = "C:\Users\JuanMiguel\image"

#I will save the picture always after 19h
while($date.Hour -lt 19)
{
    SaveImage $source "$($destination)1.jpeg"
    SaveImage $source "$($destination)2.jpeg"
    #I take the date again
    $date = Get-Date
}

#Check if that picture exists, otherwise I will save it
if(!(Test-Path $pictureFullPath))
{
    SaveImage $source $pictureFullPath
}

#Endless loop
while(1)
{
    SaveImage $source "$($destination)1.jpeg"
    SaveImage $source "$($destination)2.jpeg"
}

As PowerShell is a high level programming language (very high indeed), I tried to program the script in a non-traditional way, checking the less information as possible. Of course, it would have been cleaner if I’d only used one infinite loop asking all the time about the hour and checking if the image I want to save exists, but that way I have to ask many times to the computer, therefore, more work, more wasted resources, less battery, etc. Sometimes it’s better to think more about the performance and less about how easy to read the code is, mainly when we have so simple code like this.


17h and almost dark.. but winter will be fun!

Build an OpenStreetMap server on Ubuntu 10.04

Index
1.-Introduction
2.-Let’s start
3.-Preparing the database
4.-Install Mapnik library
5.-Install prepared world boundary data
6.-Render your first map
7.-Troubleshooting

1.-Introduction

Firstly I woudl like to thank “rw”, the author of the post this post is about. This post is based (95%) on this one (currently not available, but you can check it out here)

My main intention is spread this post to all my viewers and save here this knowledge about OSM platform to have at least an online reference for everyone (and of course, for me). This is neither an introduction nor post information about OSM, but just technical info about building up your own OSM server. I also would like to improve my knowledge about this server (I don’t want just to download, install and run it, it would be nice trying to understand it).

I won’t just copy and paste the same content of there, because (as an ordinary large installation) I had problems installing this platform and I solved then, so I will write here everything I saw, I solved, and my personal conclusions. I also will go in depth in some issues like explaining some commands and stuff.

2.-Let’s start

Upgrade your system

Just for security issues, it is recommended to update and upgrade your system, but not necessary.

sudo apt-get update
sudo apt-get upgrade

Get some system tools

sudo apt-get install subversion autoconf screen munin-node munin htop

Subversion: we’ll use it to donwload files from some repositories.
Autoconf: software to generate autoconfig scripts.
Screen: Screen is a full-screen window manager that multiplexes a physical terminal between several processes, typically interactive shells.
Munin-node: software to monitoring our server from the client.
Munin: client of munin-node.
Htop: software to check and monitoring the system used resources.

Organize your filesystem a bit

cd ~
mkdir src bin planet

  • src: source of mapnik.
  • bin: here we’ll have the scripts to generate the image and load the database.
  • planet: planet (or piece) database we’re gonna build up.

Get the latest planet (OSM file)

Well, in this part we can download the entire world wide database (nowadays [20 dec 2012] is 24GBs) or maybe we can download not the world but a piece. Just for testing I will choose download a piece.

cd planet
wget http://planet.openstreetmap.org/planet-latest.osm.bz2

3.-Preparing the database

Here we’re gonna download postgresql to deploy our own database there and some required libraries to use it.

sudo apt-get install postgresql-8.4-postgis postgresql-contrib-8.4
sudo apt-get install postgresql-server-dev-8.4
sudo apt-get install build-essential libxml2-dev
sudo apt-get install libgeos-dev libpq-dev libbz2-dev proj

Build-essential: This package contains an informational list of packages which are considered essential for building Debian packages.
Libxml2-dev: Very useful if you wish to develop your own programs using the GNOME XML library.
Libgeos-dev: GEOS provides a spatial object model and fundamental geometric functions. It implements the geometry model defined in the OpenGIS Consortium Simple Features Specification for SQL.
Libpq-dev: Header files and static library for compiling C programs to link with the libpq library in order to communicate with a PostgreSQL database backend.
Libbz2-dev: Static libraries and include files for the bzip2 compressor library.
Proj: Standard Unix filter function which converts geographic longitude and latitude coordinates into cartesian coordinates, by means of a wide variety of cartographic projection functions.

Install osm2pgsql from the repository

We firstly download osm2pgsql from the repository and after that, configurate it. osm2pgsql is a utility program that converts OpenStreetMap data to PostgreSQL databases.

cd ~/bin
svn co http://svn.openstreetmap.org/applications/utils/export/osm2pgsql/
cd osm2pgsql
./autogen.sh (Error?)
./configure
make

Configure the PostGIS database

edit /etc/postgresql/8.4/main/postgresql.conf in four places. These changes help with the large quantities of data that we are using.

107: shared_buffers = 128MB # 16384 for 8.1 and earlier
170: checkpoint_segments = 20
(new line): maintenance_work_mem = 256MB # 256000 for 8.1 and earlier
387: autovacuum = off

edit /etc/sysctl.conf

(new line) kernel.shmmax=268435456

Remind that the above only takes effect after a reboot. Making this work immediately requires the following.

sudo sysctl kernel.shmmax=268435456

Restart postgres to enable the changes.

sudo /etc/init.d/postgresql-8.4 restart

Create a database called “gis”. Some of our future tools presume that you will use this database name. Substitute your username for “username” in two places below. This should be the username that will render maps with mapnik.
Note from delanover author: I had problems with the username so I decided to use the same username that in the computer server system.

sudo -u postgres -i
createuser username # answer yes for superuser
createdb -E UTF8 -O username gis
createlang plpgsql gis
exit

Set up PostGIS on the postresql database.

psql -f /usr/share/postgresql/8.4/contrib/postgis.sql -d gis

This should respond with many lines ending with


CREATE FUNCTION
COMMIT

Substitute your username for “username” in two places in the next line. This should be the username that will render maps with mapnik.

echo “ALTER TABLE geometry_columns OWNER TO username; ALTER TABLE spatial_ref_sys OWNER TO username;” | psql -d gis

Should reply with

ALTER TABLE
ALTER TABLE

Enable intarray

psql -f /usr/share/postgresql/8.4/contrib/_int.sql -d gis

Replies with many lines ending with


CREATE FUNCTION
CREATE OPERATOR CLASS

Set the Spatial Reference Identifier (SRID) on the new database.

psql -f ~/bin/osm2pgsql/900913.sql -d gis

Should reply with

INSERT 0 1

Load planet into the database with osm2pgsql

cd ~/bin/osm2pgsql
./osm2pgsql -S default.style –slim -d gis -C 2048 ~/planet/YourFileMap.osm.bz2 (Error?)

Note: load 8.4GB take 30 hours, and particularly 1.4GB took me 3-4 hours (it depends of the I/O), so be patient.

Completed planet_osm_roads
Copying planet_osm_polygon to cluster by geometry finished
Copying planet_osm_line to cluster by geometry finished
Creating indexes on planet_osm_polygon finished
All indexes on planet_osm_polygon created in 4257s
Completed planet_osm_polygon
Creating indexes on planet_osm_line finished
All indexes on planet_osm_line created in 5053s
Completed planet_osm_line
Stopped table: planet_osm_ways in 16095s
Osm2pgsql took 29436s overall

4.-Install Mapnik library

sudo apt-get install libltdl3-dev libpng12-dev libtiff4-dev libicu-dev
sudo apt-get install libboost-python1.40-dev python-cairo-dev python-nose
sudo apt-get install libboost1.40-dev libboost-filesystem1.40-dev
sudo apt-get install libboost-iostreams1.40-dev libboost-regex1.40-dev libboost-thread1.40-dev
sudo apt-get install libboost-program-options1.40-dev libboost-python1.40-dev
sudo apt-get install libfreetype6-dev libcairo2-dev libcairomm-1.0-dev
sudo apt-get install libgeotiff-dev libtiff4 libtiff4-dev libtiffxx0c2
sudo apt-get install libsigc++-dev libsigc++0c2 libsigx-2.0-2 libsigx-2.0-dev
sudo apt-get install libgdal1-dev python-gdal
sudo apt-get install imagemagick

Libltdl3-dev: A small library that aims at hiding the various difficulties of dlopening libraries from programmers. It is a system independent dlopen wrapper for GNU libtool.
Libpng12-dev: Library implementing an interface for reading and writing PNG format files.
Libtiff4-dev: Library providing support for the Tag Image File Format (TIFF), a widely used format for storing image data. This package includes the development files, static library, and header files.
Libicu-dev: ICU is a C++ and C library that provides robust and full-featured Unicode and locale support. This package contains the development files for ICU along with programs used to manipulate data files found in the ICU sources.
Libboost libraries: Boost provides free peer-reviewed portable C++ source libraries.
Python libraries: So obvious.
Libfreetype6-dev: This package contains all supplementary files (static library, headers and documentation) you need to develop your own programs using the FreeType 2 library (digital typography library).
Libcairo2-dev: Cairo is a multi-platform library providing anti-aliased vector-based rendering for multiple target backends.
Libgeotiff-dev: The GeoTIFF standard has been developed for reading, and writing geographic meta-information tags on top of TIFF raster.
Tiff libraries: So obvious, to work with tiff format.
Libsigc libraries: implement a typesafe callback system for standard C++. It allows you to define signals and to connect those signals to any callback function, either global or a member function, regardless of whether it is static or virtual.
Libgdal1-dev: GDAL is a translator library for raster geospatial data formats. As a library, it presents a single abstract data model to the calling application for all supported formats.
Imagemagick: software suite to create, edit, compose, or convert bitmap images.

Build Mapnik library from source.

cd ~/src
svn co http://svn.mapnik.org/tags/release-0.7.1/ mapnik (Error? offline)
cd mapnik
python scons/scons.py configure INPUT_PLUGINS=all OPTIMIZATION=3 SYSTEM_FONTS=/usr/share/fonts/truetype/ (Error? boost version)
python scons/scons.py #be patient here
sudo python scons/scons.py install
sudo ldconfig

Confirm that Mapnik library is installed.

python
>>> import mapnik
>>>

Install Mapnik tools

cd ~/bin
svn co http://svn.openstreetmap.org/applications/rendering/mapnik

5.-Install prepared world boundary data

cd ~/bin/mapnik
mkdir world_boundaries
wget http://tile.openstreetmap.org/world_boundaries-spherical.tgz
tar xvzf world_boundaries-spherical.tgz
cd world_boundaries
wget http://tile.openstreetmap.org/processed_p.tar.bz2
bunzip2 processed_p.tar.bz2
tar xvf processed_p.tar
wget http://tile.openstreetmap.org/shoreline_300.tar.bz2
bunzip2 shoreline_300.tar.bz2
tar xvf shoreline_300.tar

6.-Render your first map

cd ~/bin/mapnik
chmod +x generate_xml.py
./generate_xml.py –dbname gis –accept-none [IMPORTANT NOTE]

IMPORTANT NOTE: I don’t know why but the double hyphen is not seen. Remember is “–” (two “-“) and not only one “-“.

Include files written successfully! Pass the osm.xml file as an argument if you want to serialize a new version or test reading the XML

Now we finally generate the image.

./generate_image.py (Error?)

The result of this is having a 10000x5000px PNG image of England en your mapnik folder. Remember, be patient.

Hope you enjoy this tutorial!

7.-Troubleshooting

Error 1: Configuring at installing osm2pgsql
Output error at performing ./configure when installing osm2pgsql:

Can’t exec “libtoolize”: No such file or directory at /usr/bin/autoreconf line 189.
Use of uninitialized value in pattern match (m//) at /usr/bin/autoreconf line 189.
autoreconf: Entering directory `.’
autoreconf: configure.ac: not using Gettext
autoreconf: running: aclocal –force -I m4
configure.ac:41: warning: macro `AM_PROG_LIBTOOL’ not found in library
autoreconf: configure.ac: tracing
autoreconf: configure.ac: not using Libtool
autoreconf: running: /usr/bin/autoconf –force
configure.ac:41: error: possibly undefined macro: AM_PROG_LIBTOOL
If this token and others are legitimate, please use m4_pattern_allow.
See the Autoconf documentation.
autoreconf: /usr/bin/autoconf failed with exit status: 1

Solution
You can’t exec libtoolize, so you must install libtool before continue, writting down:

sudo apt-get install libtool

Error 2: Loading planet into the database
Maybe you get this error while loading the data:

The target database has the intarray contrib module loaded.
While required for earlier versions of osm2pgsql, intarray
is now unnecessary and will interfere with osm2pgsql’s array
handling. Please use a database without intarray.

Error occurred, cleaning up

To fix it, we’ll do some fix located in the official documentation.

sudo -u postgres -i -H
dropdb ptgis
### here the old database is dropped
createdb -E UTF8 -O ptuser ptgis
createlang plpgsql ptgis

# for Ubuntu <=9.10: # psql -d ptgis -f /usr/share/postgresql/8.3/contrib/_int.sql ### (do not execute this line) psql -d ptgis -f /usr/share/postgresql-8.3-postgis/lwpostgis.sql # for Ubuntu >=10.04:
#psql -d ptgis -f /usr/share/postgresql/8.4/contrib/_int.sql ### (do not execute this line)
psql -d ptgis -f /usr/share/postgresql/8.4/contrib/postgis.sql
psql ptgis -c “ALTER TABLE geometry_columns OWNER TO ptuser”
psql ptgis -c “ALTER TABLE spatial_ref_sys OWNER TO ptuser”
exit

# for Ubuntu <=9.10: sudo /etc/init.d/postgresql-8.3 reload # for Ubuntu >=10.04:
sudo /etc/init.d/postgresql-8.4 reload

psql ptgis ptuser -f osm2pgsql/900913.sql

Now, we try to load the data again.

Error 3: Offline mapnik repository
I set this up as an error because who knows, maybe someday is online again. But now it is not, so let’s find another place to download it.
We need to download git software in order to download from a git repository, and after that, we’ll be able to download mapnik from here

sudo apt-get install git-core
git clone https://github.com/mapnik/mapnik.git

Error 4: Boost version >= 1.47 required
We can actually check our boost version looking at line 30 in /usr/include/boost/version.hpp file to realize that we don’t have 1.47 version or greater, so, we have to upgrade it. This is not that simple than apt-get install, but is this simple: download and install it.

We need to download the last version (http://www.boost.org/) (nowadays, 1.52, from http://sourceforge.net/projects/boost/files/boost/1.52.0/). We select tar.bz2 file, unzip it, configure it and so on.

bunzip2 boost_1_52_0.tar.bz2
tar xvf boost_1_52_0.tar
./bootstrap.sh
./b2
sudo ./b2 install

Error 5: Needed files don’t exist!
After trying to generate the image (what a bad luck, failing in the last step…) this error might be returned to you.

RuntimeError: Shape Plugin: shapefile ‘/home/lipman/bin/mapnik/world_boundaries/110m_admin_0_boundary_lines_land.shp’ does not exist encountered during parsing of layer ‘necountries’ in Layer at line 58 of ‘osm.xml’

The only problem here is we need many files that we don’t have, so let’s download and move them to fix it into world_boundaries folder.
I found that files here. We have to donwload this below:

  • 110m_admin_0_boundary_lines_land.shp
  • 110m_admin_0_boundary_lines_land.dbf
  • 10m_populated_places.shp (*)
  • 10m_populated_places.dbf (*)

(*): We have to rename them to “ne_10m…”