Index
1.-Introduction
1.1.-Quick Description
1.2.-Why this Home Media Center is so cool?
1.3.-Video Presentation
2.-Install
2.1.-First steps
3.-Wiki
4.-Skills acquired
5.-License
1.-Introduction
This is my Final Project Work (a project we have to do when we finish our bachelor). One of the reasons why I chose this to be my project was because I wanted to develop something that you can use. As I like theoretical stuff, it would have been interesting to invest my time researching about some nice topic, but actually, it wasn’t 100% up to me because since I’m doing an exchange abroad, I need to get credits in my home university and we all decided the topic of my project. Still, I’m quite happy with the results because in the end I could develop something interesting, I could use some knowledge I had about the topic (and some code) and, of course, I learned.
1.1.-Quick Description
I developed a HMC (Home Media Center) which is able to play media files using a Raspberry Pi as a server.
After you install the script in the RPi, you can directly plug the TV cable to it and start using it. It can read USB devices and shared folder across the network.
1.2.-Why this Home Media Center is so cool?
Well, it’s not so cool, and the GUI has to be improved (//TODO), but I developed something I didn’t find in other home media centers. I’m using a wireless dongle which is connected to the USB port, this way, the RPi can check wireless networks and connect to them as well. This is really convinient since not all people have the TV screen next to the router, so it’s more clean and comfortable to use wireless technology. Anyway, depending on your wireless dongle and router (and in general, the wireless conection quality) you will be able to play some certain files depending on the bit/s needed to play them. If your router and the Pi are very far, the connection quality will be poor and not high definition files will be able to be played.
Didn’t you understand? In a few words: you can have your Pi connected to the TV and your router, and play files located in any other device in the same network.
This three diagrams will ilustrate better what you can do:
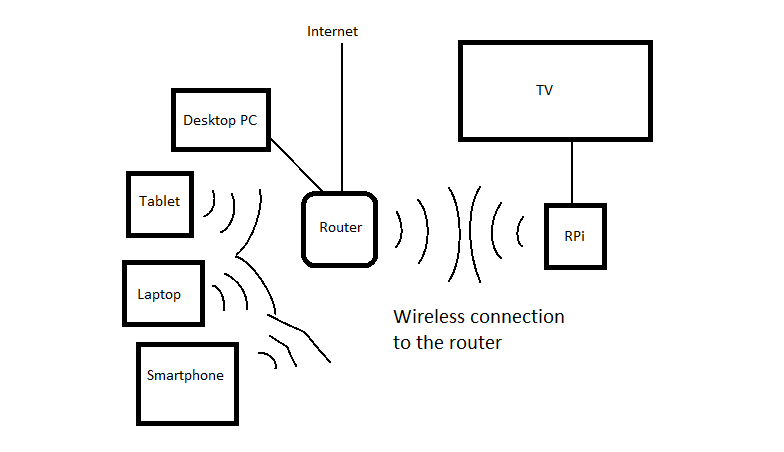
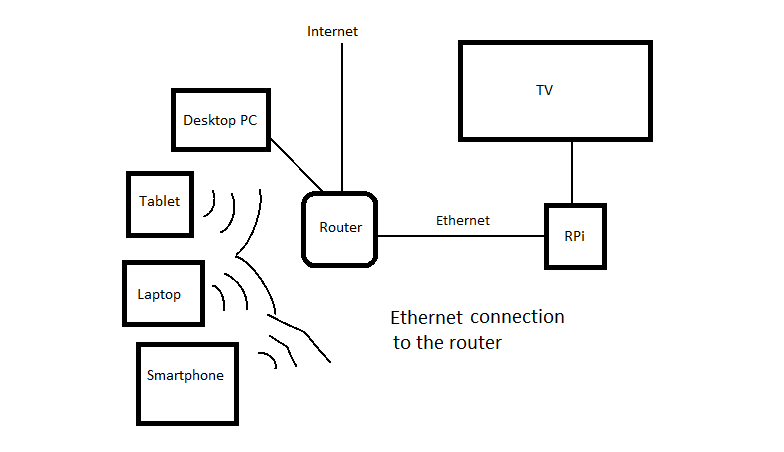
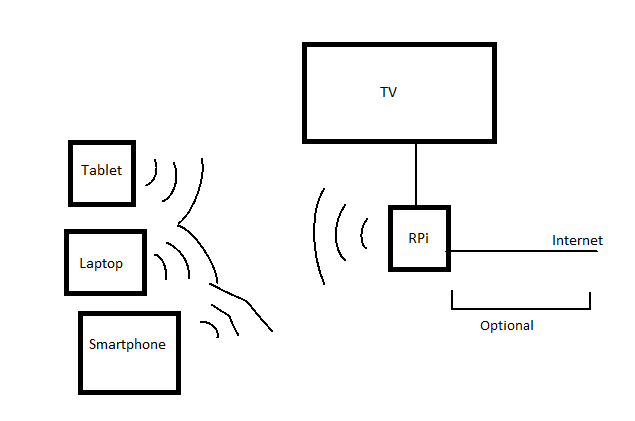
We can actually make more complex diagrams such as connecting a switch to the RPi and so on. This is really flexible.
1.3.-Video Presentation
Video: https://www.youtube.com/watch?v=m0QRhsXRhoU
2.-Install
In a few words: Install Raspbian and update it, download the code and run install.sh. Finally, change some settings and reboot it.
During the installation process it will ask us twice (or three times actually) for a MySQL password. Please, write root. The first and second time you will write this will be when installing the database itself (password and confirmation). The third time will be when updating the database. If you don’t write root, the webserver is not going to work because it assumes that that password is root.
~$ sudo apt-get update -y && sudo apt-get upgrade -y

~$ wget http://old.delanover.com/projects/hmc/hmc.zip

~$ unzip hmc.zip

~$ cd hmc

~$ chmod 777 install.sh

~$ sudo ./install.sh
After this is finished, now we need to not get any pop up when inserting an USB device. For this, it is needed to go to the file manager (next to the Start button), in to the toolbar click on “Edit”, “Preferences”, go to “Volume Management” tab, and uncheck “Show available options for removable media when they are inserted”. For the future, this will be done automatically in the install.sh file.
Finally, we need to reboot it.
2.1.-First steps
3.-Wiki
As a good open source project has, I made a wiki which will be updated every time I modify or I need to clarify/specify something about the project. I think it’s the best way to fully explain how the system works and therefore encourage more people to use it and modify it. I tried to explain it as clear as possible and keep it simple.
Here is the wiki: Not available anymore.
Anyway, if you have any question, you’re free to ask me.
4.-Skills acquired
After I developed this project, I acquired and improved some skills I can proudly announce:
- Introduction to Python.
- More experience developing and designing web pages.
- More experience with shell script.
- Better understanding about Linux (startup, services, processes, …).
- More experience about development methodologies.
- Software testing.
- Maintenance of a Wiki web page.
5.-License
Do whatever you want except selling it or any part of the code. This project is intended to be free and open for everybody, so people can see the code, learn, and more people can download it.