The PC I was working with has 2 hard disks. One of them was using Windows 10 and the other one was used as an additional storage. I burned Ubuntu 16.04.4 using Rufus (default configuration, including the partition scheme) on a USB Drive. I shrank the second drive so that I had around 900 GBs unallocated, and when I installed Ubuntu I chose “Install along with Windows”. It automatically installed it there. As a result, I got 2 EFI partitions: the one that I had before (windows) and a new one in the second drive. Finally, to make all of this work, I had to go to the BIOS (F10) and disable Secure Boot and change the order (first ubuntu, second windows).
Category: Uncategorized
[Solved] Lenovo Y700 dual boot (Windows 10 and Ubuntu 16.04)
After my screen mysteriously stopped working properly, I brought my computer to the shop where I bought it and Lenovo replaced my screen successfully without any extra cost (except for the fact that I had to go to other country twice). Well, for some reason, they thought it would be a good idea to format my PC that previously had Windows and Ubuntu, but even if the Ubuntu partitio was there, I couldn’t access. Anyway, I decided that it was a good idea to format Ubuntu, but it was not as straightforward as I would had liked and I read about many different solutions, so I will just write mine and hopefully it will be useful to someone.
Step 1: Create a bootable USB choosing “GPT partition scheme for UEFI”. I used the Ubuntu 16.04.2 LTS amd64 iso.
Step 2: Go to the BIOS screen (press F2 very fast when booting) and go to “Boot”. Boot mode: UEFI. Fast boot: Disabled. USB Boot: Enabled. Go to “Security”. Secure Boot: Disabled.
Step 3: Reboot the computer with the USB plugged in. If you can’t boot from the USB go to the BIOS and on “Boot”, EFI section, move the USB up to be the first one to boot. If not, it might not boot and might boot Windows instead (this happened to me all the time).
Step 4: Install Ubuntu and enjoy.
Artificial Intelligence
I temporaly decided to stop writing about general stuff and focus on Artificial Intelligence. Because of this, I opened a new WordPress blog in a subdomain of mine –> http://laid.delanover.com.
Neural Networks, Image Processing, [Un]supervised learning, and so on. I also decided to share every piece of code uploading it to my personal github repositories which can be found in the new blog.
Project Work – Home Media Center
Index
1.-Introduction
1.1.-Quick Description
1.2.-Why this Home Media Center is so cool?
1.3.-Video Presentation
2.-Install
2.1.-First steps
3.-Wiki
4.-Skills acquired
5.-License
1.-Introduction
This is my Final Project Work (a project we have to do when we finish our bachelor). One of the reasons why I chose this to be my project was because I wanted to develop something that you can use. As I like theoretical stuff, it would have been interesting to invest my time researching about some nice topic, but actually, it wasn’t 100% up to me because since I’m doing an exchange abroad, I need to get credits in my home university and we all decided the topic of my project. Still, I’m quite happy with the results because in the end I could develop something interesting, I could use some knowledge I had about the topic (and some code) and, of course, I learned.
1.1.-Quick Description
I developed a HMC (Home Media Center) which is able to play media files using a Raspberry Pi as a server.
After you install the script in the RPi, you can directly plug the TV cable to it and start using it. It can read USB devices and shared folder across the network.
1.2.-Why this Home Media Center is so cool?
Well, it’s not so cool, and the GUI has to be improved (//TODO), but I developed something I didn’t find in other home media centers. I’m using a wireless dongle which is connected to the USB port, this way, the RPi can check wireless networks and connect to them as well. This is really convinient since not all people have the TV screen next to the router, so it’s more clean and comfortable to use wireless technology. Anyway, depending on your wireless dongle and router (and in general, the wireless conection quality) you will be able to play some certain files depending on the bit/s needed to play them. If your router and the Pi are very far, the connection quality will be poor and not high definition files will be able to be played.
Didn’t you understand? In a few words: you can have your Pi connected to the TV and your router, and play files located in any other device in the same network.
This three diagrams will ilustrate better what you can do:
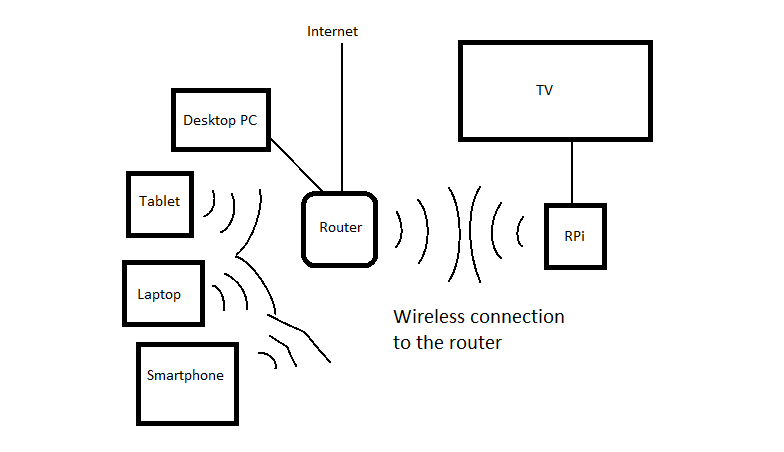
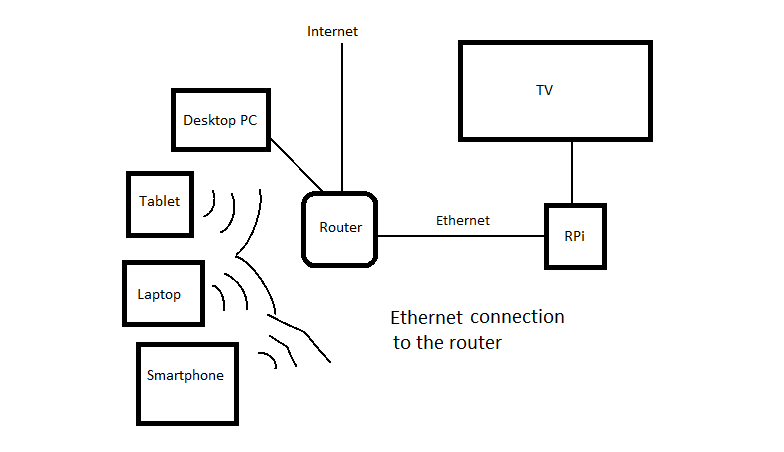
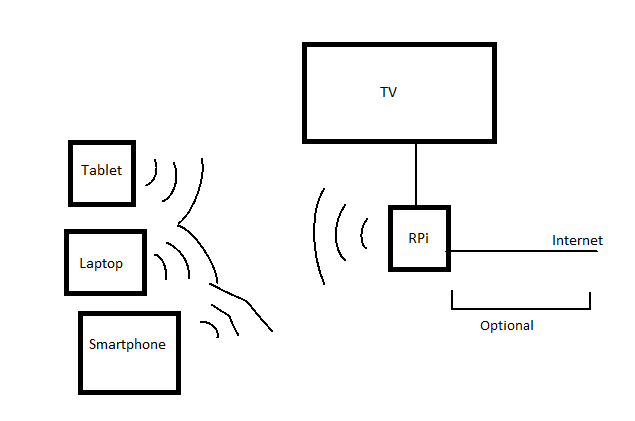
We can actually make more complex diagrams such as connecting a switch to the RPi and so on. This is really flexible.
1.3.-Video Presentation
Video: https://www.youtube.com/watch?v=m0QRhsXRhoU
2.-Install
In a few words: Install Raspbian and update it, download the code and run install.sh. Finally, change some settings and reboot it.
During the installation process it will ask us twice (or three times actually) for a MySQL password. Please, write root. The first and second time you will write this will be when installing the database itself (password and confirmation). The third time will be when updating the database. If you don’t write root, the webserver is not going to work because it assumes that that password is root.
~$ sudo apt-get update -y && sudo apt-get upgrade -y

~$ wget http://old.delanover.com/projects/hmc/hmc.zip

~$ unzip hmc.zip

~$ cd hmc

~$ chmod 777 install.sh

~$ sudo ./install.sh
After this is finished, now we need to not get any pop up when inserting an USB device. For this, it is needed to go to the file manager (next to the Start button), in to the toolbar click on “Edit”, “Preferences”, go to “Volume Management” tab, and uncheck “Show available options for removable media when they are inserted”. For the future, this will be done automatically in the install.sh file.
Finally, we need to reboot it.
2.1.-First steps
3.-Wiki
As a good open source project has, I made a wiki which will be updated every time I modify or I need to clarify/specify something about the project. I think it’s the best way to fully explain how the system works and therefore encourage more people to use it and modify it. I tried to explain it as clear as possible and keep it simple.
Here is the wiki: Not available anymore.
Anyway, if you have any question, you’re free to ask me.
4.-Skills acquired
After I developed this project, I acquired and improved some skills I can proudly announce:
- Introduction to Python.
- More experience developing and designing web pages.
- More experience with shell script.
- Better understanding about Linux (startup, services, processes, …).
- More experience about development methodologies.
- Software testing.
- Maintenance of a Wiki web page.
5.-License
Do whatever you want except selling it or any part of the code. This project is intended to be free and open for everybody, so people can see the code, learn, and more people can download it.
Breve introducción a la programación con CUDA: Guía de Instalación, Códigos y Compilación
Índice:
1.-Introducción
2.-Instalación
2.1.-Configurando Visual Studio 2008
3.-Compilación
3.1.-Hola Mundo
3.2.-Jugando con la memoria
1.-Introducción
La tecnología CUDA (Compute Unified Device Architecture) es una arquitectura de computación paralela desarrollada por nVidia lanzada en 2007. Esta tecnología permite a los programadores desarrollar aplicaciones o programas que se ejecuten en la GPU de la tarjeta gráfica. Este lenguaje es una variación de C, por lo que los que lo conocen, ya tienen una gran ventaja.
No me quiero extender mucho más en la introducción para pasar a lo importante cuanto antes, ya que si has venido buscando cómo empezar a programar en CUDA es de suponer que sabes lo que es.
2.-Instalación
Para empezar, nos descargaremos el Visual Studio 2008 Express (Versión de C++) ya que lo usaremos para escribir y compilar nuestro código (opcional).
Por otra parte, nos tenemos que descargar los archivos relacionados con CUDA, que son dos (o tres, este último que explicaremos será opcional). Todos ellos, los descargaremos de aquí. Por un lado, necesitamos los drivers para CUDA, en los que, importante, no son los mismos para portátiles que para ordenadores de sobremesa.

Por otro lado, nos descargaremos el CUDA Toolkit, que es el que tiene los archivos para los desarrolladores (compilador y demás). Finalmente, y de manera opcional, podemos descargarnos el “CUDA SDK code samples” que incluye códigos de muestra para veamos si funciona.
Si tenemos algún problema en la instalación, podemos probar a reinstalar los drivers (normales) de nuestra tarjeta.
Por otra parte, si no sabemos si nuestra tarjeta tiene CUDA, podemos consultarlo aquí.
2.1.-Configurando Visual Studio 2008
Tras instalar el SDK, en la ruta por defecto de instalación (C:\ProgramData\NVIDIA Corporation\NVIDIA GPU Computing SDK\SDK Browser) encontraremos un archivo llamado browser.exe, que es el navegador (como su propio nombre indica) sobre el cual podremos ver los archivos de muestra y correrlos para verlos funcionar.
A continuación le daremos a cualquier “Files”, ya que realmente todos nos llevan al mismo directorio (siendo que deberian de llevar cada uno a su propio directorio pero bueno). Si no, directamente nos dirigiremos a C:\ProgramData\NVIDIA Corporation\NVIDIA GPU Computing SDK\C\src.

Nos metemos en una carpeta cualquiera, en este caso, la de templates y abrimos el fichero template_vc90.sln. Se deberia de abrir con el Visual Studio 2008.
Como podemos observar, es un proyecto formado por 3 ficheros, de los cuales podemos ver que hay algunos con extensión cu. Efectivamente, “cu” va a ser la extensión del código fuente en CUDA. Por otra parte, podemos observar que no nos aparece el código coloreado, sin embargo si que aparece coloreado en el fichero .cpp

Para ello, nos dirigiremos a Herramientas -> Opciones -> Editor de texto -> Extensiones de archivo, y escribiremos “cu” (sin el punto) y le daremos a “Añadir”. Posteriormente, si reiniciamos el Visual Studio ya nos pondrá bien la sintaxis.
Por otra parte, también querremos que las palabras reservadas nos las coloree para que quede más bonito y sencillo a la vista. Para ello, nos dirigiremos a C:\ProgramData\NVIDIA Corporation\NVIDIA GPU Computing SDK\C\doc\syntax_highlighting\visual_studio_8 y abrimos el archivo usertype.dat con algún editor de texto. Como podremos ver, contiene palabras reservadas, que son las que se volverán de color azul al escribirlas en el VS2K8. Copiamos este archivo, y lo llevamos a la siguiente ruta: C:\Program Files\Microsoft Visual Studio 9.0\Common7\IDE. Como dije anteriormente, reiniciamos el Visual Studio y podremos ver la nueva sintaxis remarcada.
3.-Compilación
A pesar de haber configurado el Visual C++, al ser nuestra primera compilación, la haremos directamente desde la consola de Windows. Usaremos dos códigos sencillitos, sacados de aquí.
3.1.-Hola Mundo
Como viene muy bien explicado, poco más he de añadir. En este primer ejemplo, simplemente añadiremos la cabecera cuda.h para que comprobemos que, en caso de no tenerlo, nos daria un error.
Lo guardamos como hola.cu en el escritorio por ejemplo, y nos vamos a la consola, usando el NVCC.
//Agregamos libreria standard
#include
//Agregamos libreria cuda
#include
//Funcion principal
main()
{
    //Imprimimos texto y salto de linea
    printf("Hola mundo\n");
}

3.2.-Jugando con la memoria
Con este código, tocaremos un poco la memoria interna de nuestra GPU, también viene bastante bien explicado:
//Libreria estandar
#include
//Libreria cuda
#include

//Definimos el tamanio de nuestro array
#define SIZE 128

//Funcion principal
main()
{
    //Definimos
    float *array_pc;    //Aqui guardaremos el array en nuestra RAM
    float *array_pc2;    //Aqui guardaremos la lectura del array cuando vuelva de la grafica
    float *array_grafica;    //Usaremos este puntero para el array en la grafica.
    size_t totaltamanio = sizeof(float)*SIZE;    //Calculamos el tamanio que tendra nuestro array
    int i;            //Variable auxiliar para utilizar en bucle.

    //Reservamos espacio para los arrays de nuestra RAM
    array_pc = (float *)malloc(totaltamanio);
    array_pc2 = (float *)malloc(totaltamanio);
    //Reservamos espacio para el array de nuestra grafica
    cudaMalloc((void **)&array_grafica,totaltamanio);

    //Bucle de 0 a SIZE (Sin incluir SIZE)
    for(i=0;i
Y tras ejecutarlo:

